Canning for Beginners: How to Get Started Safely and Easily
There’s something incredibly satisfying about opening a jar of homemade jam, pickles, peaches, or tomato sauce in the middle of winter and remembering that you preserved it yourself.
If you’ve never tried it before, though, canning for beginners can feel a little intimidating. There are special equipment, different canning methods, specific processing times, and a lot of information to keep straight.
The good news? You don’t need to become an expert before you get started.
With the right equipment, a reliable tested recipe, and a little patience, home canning can be a surprisingly approachable way to preserve seasonal produce and make the most of your garden, a farmers’ market haul, or a great sale at the grocery store.
Here’s what you need to know to get started.
What Is Home Canning?
Home canning is a method of preserving food by placing it in jars and processing the jars using heat.
The heat destroys microorganisms and creates a sealed environment that helps keep the food safe for storage.
Canning has been around for centuries, but modern home canning became much more practical with the development of glass canning jars and reliable sealing methods.
Today, canning is popular with gardeners, homesteaders, farmers’ market shoppers, and anyone who enjoys preserving seasonal food.
And you don’t need a huge garden to give it a try. A few baskets of peaches, a big batch of tomatoes, or a bumper crop of cucumbers can be enough to get you started.
Canning for Beginners: What Supplies Do You Need?
One of the nice things about starting with water bath canning is that you don't need a kitchen full of specialized equipment.
For a basic water bath canning project, you'll typically need:
A water bath canner with a rack, or an appropriate large pot with a rack
Canning jars in the size recommended by your recipe
You may already have some of these items in your kitchen.
And before buying everything brand new, check thrift stores, garage sales, or your own cupboards for equipment. Just be careful with used jars and other equipment: jars with chips, cracks, or damage shouldn't be used for canning.
For pressure canning, you'll also need a proper pressure canner designed for home food preservation.
The Two Main Canning Methods
There are two primary methods you'll find when you're learning about canning: water bath canning and pressure canning.
Water Bath Canning
Water bath canning uses boiling water to process jars.
It's generally used for high-acid foods, including many fruits, jams, jellies, pickles, relishes, and properly acidified tomato recipes.
If you're brand new to canning, water bath canning is often the easiest place to start.
It's relatively straightforward, and there are a lot of beginner friendly recipes to choose from.
Pressure Canning
Pressure canning is used for low-acid foods, such as many vegetables, meats, poultry, and some combination foods.
These foods require a higher processing temperature than a boiling water bath can provide. A pressure canner allows that higher temperature to be reached. Pressure canning is an excellent preservation method, but it's important to learn the process carefully and follow a tested recipe exactly.
Never substitute water bath canning for pressure canning when a recipe specifically calls for pressure canning.
Choose a Tested Canning Recipe
This is probably the most important advice for anyone learning canning for beginners: Don't improvise when it comes to canning recipes.
Canning isn't like making soup, where you can casually add another ingredient or change the proportions. The acidity, density, jar size, processing time, and processing method can all affect whether a canned food is safe.
When choosing your first recipe, look for something relatively simple. Pickles, fruit, jams, and other water bath recipes can be good introductions. Be sure to choose something you actually want to eat! There’s no point spending an afternoon canning 12 jars of something your family won't touch.
Prepare Your Jars and Equipment
Before you start, inspect your jars carefully.
Don't use jars with cracks, chips, or other damage. Pay close attention to the rim. Wash your jars, lids, and bands according to the directions provided with your recipe and the manufacturer's recommendations.
Whether jars need to be sterilized before filling depends on the recipe and processing time. Follow the instructions in your tested recipe rather than automatically boiling every jar for 10 minutes.
If your recipe calls for the jars to be kept hot before filling, you can keep them in hot water until you're ready to use them.
Fill Your Jars Carefully
Once your food is ready, use a canning funnel to make filling the jars much easier.
Your recipe will tell you exactly how much headspace to leave at the top of each jar. Headspace is the space between the surface of the food and the rim of the jar, and it plays an important role in creating a proper seal.
Don't guess at the amount. Follow the recipe.
Before putting on the lid, check the rim of the jar and wipe away any food or liquid that may have spilled onto it. Then place the lid and screw band on according to the manufacturer's directions. Avoid overtightening the band.
Process the Jars According to the Recipe
Now comes the actual canning process.
Place the filled jars into your water bath canner or pressure canner, depending on the recipe you're following.
Processing times aren't interchangeable. They can vary based on the food, jar size, altitude, preparation method, and type of canning. That's why it's so important to use the processing time and method specified in your tested recipe.
If you're water bath canning, make sure the jars are covered with the required amount of water throughout processing.
If you're pressure canning, follow the pressure, processing time, and altitude adjustments specified in your recipe.
Don't shorten the processing time because the jars look sealed or because you're in a hurry.
What About Reusing Canning Lids?
This is an area where older canning advice can cause confusion.
Traditional flat canning lids are designed for single use. Don't reuse them for another batch of shelf-stable canned food.
Screw bands, on the other hand, can generally be reused as long as they're in good condition and aren't rusty or damaged.
Always follow the manufacturer's current recommendations for the particular lids and jars you're using.
What Should You Do After Canning?
When processing is complete, carefully remove the jars using a jar lifter and place them upright on a towel or other protected surface.
Leave them undisturbed while they cool. As the jars cool, you may hear the satisfying little pop of the lids sealing. Don't press the lids down to test them while they're cooling.
After the recommended cooling period, check the seals according to your recipe or canning guide. Any jar that hasn't sealed properly should be handled according to current food-safety guidance rather than simply being stored on the shelf.
Once you've confirmed the jars have sealed, label them with the contents and date.
Start Small
If you've been intimidated by home canning, don't feel like you need to preserve an entire garden on your first attempt. Start with one recipe.
A small batch of pickles or fruit is a great way to become familiar with the equipment, filling jars, processing, and storing your finished product.
Once you're comfortable with the process, you can branch out into more recipes and eventually try pressure canning if you'd like!
A Few Important Canning for Beginners Safety Rules
Canning is a fantastic way to preserve food, but food safety should always come first.
Keep these basic rules in mind:
Use current, tested recipes from a reputable source.
Follow the recipe's ingredients, preparation method, jar size, headspace, and processing time.
Don't alter the proportions of ingredients in a canning recipe unless the source specifically says the substitution is safe.
Use the correct canning method for the food.
Never use jars with cracks, chips, or damaged rims.
Don't reuse single-use canning lids.
Make sure your pressure canner is in good working condition and follow the manufacturer's instructions.
Make appropriate altitude adjustments when required.
If you're unsure whether a recipe or technique is safe, check with a reputable food-preservation resource before proceeding.
Canning for Beginners Doesn't Have to Be Complicated
The first time you see a kitchen counter covered with jars, equipment, towels, and fresh produce, canning can look like a lot of work. But once you understand the basic process, it becomes much less intimidating.
Start with a simple tested recipe, gather the right equipment, give yourself plenty of time, and don't be afraid to learn as you go.
Maybe the best part of canning is that you're not just preserving food, you're making the most of seasonal produce, reducing waste, and putting something homemade on your pantry shelf for later!
There's nothing quite like opening a jar of summer in the middle of winter. Ahhh, yum!
A clutter-free home doesn't happen because you spend an entire weekend decluttering every few months. In my experience, it's much easier to keep clutter under control when you develop a few simple habits that prevent it from piling up in the first place.
The goal isn't to have a perfectly organized home where nothing is ever out of place. Life happens! Kids leave things around, mail piles up, and sometimes the kitchen counter becomes the dumping ground for everything you walked through the door carrying.
The trick is to have a few habits that make dealing with clutter almost automatic. Once these habits become part of your everyday routine, keeping your home tidy takes much less effort.
Here are 7 good habits for a clutter-free home that will help you keep clutter under control without constantly feeling like you're decluttering.
One of my favourite decluttering habits is keeping a donation box somewhere convenient. Ours is in our bedroom closet.
Why? Because you are constantly coming across things you no longer need. A shirt that doesn't fit quite right. A kitchen gadget you never use. A book you've finished and know you'll never read again.
Without somewhere to put those things, they often get put back where they came from with the thought, "I'll deal with that later."
Instead, keep a box, basket or reusable bag in an accessible spot. Whenever you find something you no longer want or need, put it in the box immediately.
Once the box is full, take it to your favourite donation centre and start a new one.
You don't have to set aside an entire afternoon to find things to donate because you're making small decisions as you go.
One important rule: Don't let your donation box become a permanent fixture that you keep moving from room to room. Once it's full, get it out of the house.
2. Create Decluttering Routines
A little regular maintenance can prevent a much bigger decluttering job later.
You don't need to spend hours every day tidying your home. Instead, create a few small routines that work with your lifestyle.
For example, you might:
Spend 10 minutes tidying before bed.
Do a quick fridge clean every week.
Go through the mail as soon as it comes into the house.
Do a quick bathroom reset once a week.
Declutter one small area whenever you have a few spare minutes.
Do a seasonal check of clothing, toys and other frequently used items.
The important thing is consistency rather than perfection.
Think of it like brushing your teeth. You don't wait until your teeth are completely covered in plaque before dealing with them. You do a little maintenance regularly.
Your home can work the same way.
Small, frequent resets are much easier than waiting until the clutter has become overwhelming.
3. Create Systems for Problem Areas
Every home has a few places where clutter seems to magically appear.
Maybe it's the kitchen counter. Maybe it's the entryway. Perhaps the dining room table has somehow become the place where backpacks, paperwork, chargers and random household items go to live.
Instead of repeatedly telling yourself to "keep this area tidy," create a system that makes it easier to keep tidy.
If shoes are always scattered around the entrance, add a shoe basket or designated shoe storage.
If paperwork piles up on the counter, create one place for incoming papers.
If everyone's keys end up in different places, designate a spot for keys.
The best organizing systems are usually simple. You shouldn't need a complicated system to maintain a simple space.
Pay attention to where clutter naturally accumulates in your home. Those piles are giving you useful information about where your systems aren't working.
Instead of fighting the clutter, ask yourself: What system would make it easier to put these things away?
4. Stick to the One-In, One-Out Rule
One of the easiest ways to prevent clutter from multiplying is to make a habit of getting rid of something when you bring something new into your home.
Buy a new sweater? Consider whether there's an older one you no longer wear.
Buy a new kitchen gadget? Take a look at your kitchen drawers and see if something else can go.
Get a new pair of shoes? Check whether there's a pair you can donate.
This doesn't have to be a rigid rule for every single purchase, but it's a useful mindset.
Our homes have a limited amount of space. If we continually bring new things in without anything going out, eventually we're going to run out of room.
The one-in, one-out rule encourages you to think about the space you already have before adding something new.
And here's a little bonus: it can make you more thoughtful about shopping. When you know that bringing something new home means you'll need to find a place for it, and possibly part with something else, you may find yourself asking, "Do I really want/need this?"
Sometimes the answer will be yes. And that's perfectly fine.
5. Keep Flat Surfaces Clear
Flat surfaces have a magical ability to collect clutter.
A kitchen counter becomes a place for mail. A dining table becomes a place for homework. A dresser becomes a place for laundry, receipts and random objects that don't seem to have a home.
Keeping your flat surfaces relatively clear can make your entire home feel more peaceful.
You don't have to remove every decorative item. The goal is simply to avoid allowing surfaces to become storage areas.
Try giving yourself a simple evening reset. Before you go to bed, clear the kitchen counters, dining table and other major surfaces and return things to where they belong.
It might only take five or ten minutes, but you'll appreciate it the next morning.
There is something surprisingly satisfying about waking up to a clear kitchen counter instead of yesterday's clutter.
6. Give Everything a Home
One of the best habits you can develop for a clutter-free home is making sure everything has a designated place.
When something doesn't have a home, it usually becomes clutter.
Think about the things that regularly get lost or left lying around. Remote controls. Scissors. Batteries. Chargers. School supplies. Keys. Reusable shopping bags.
Instead of constantly searching for these things, give them a home. Make the home easy to remember and easy to use.
If something is difficult to put away, you're much less likely to put it away. A basket beside the stairs may work better than a perfectly organized cupboard if that's where everyone naturally drops things.
The goal isn't to create beautiful organizing systems for the sake of organizing. The goal is to make it easy for everyone in your home to know where things belong and where to put them back.
If you find yourself constantly asking, "Where should I put this?" that's probably a sign that the item doesn't have a home yet.
7. Don't Buy What You Really Don't Need
Of course, one of the best ways to deal with clutter is to stop bringing unnecessary things into your home in the first place.
This can be difficult! Especially when something is inexpensive or on sale.
As someone who loves a good deal, I've definitely had to learn that a bargain isn't actually a bargain if I don't need it.
Before buying something, especially an impulse purchase, ask yourself a few questions:
Do I actually need this?
Do I already own something that does the same job?
Where will I keep it?
How often will I realistically use it?
Would I still want it if it weren't on sale?
You don't have to stop buying things you enjoy. That's not what frugal living or a clutter-free home is about.
It's about being intentional with what earns a place in your home.
Sometimes the best deal is the thing you decide not to buy.
The Bottom Line
A clutter-free home isn't about constantly cleaning, organizing and getting rid of things. It's about creating habits that make clutter easier to prevent and easier to deal with when it does appear.
Keep a donation box handy. Create simple routines. Give problem areas a system. Be mindful about what comes into your home, and make sure the things you already own have somewhere to go.
You don't need to completely overhaul your home overnight.
Start with one habit. Once it becomes second nature, add another.
Little habits really do add up. Before you know it, keeping clutter under control will become just another part of everyday life.
Want to give your home a fresh new look without spending a fortune? Before you head to the store, try shopping your own home!
I find that once February rolls around, or honestly, once I've had enough of the dreary winter weather, I start craving a little change. I want things to feel brighter, fresher, and a bit more cheerful.
The good news is that you probably already have plenty of things around your home that can help you create that fresh feeling. Sometimes you don't need new stuff, you just need to look at the stuff you already own a little differently.
Here are some easy ways to decorate with things you already have and give your space a refresh without spending much (or anything at all).
Table of Contents
1. Get Creative with Spray Paint
Never underestimate what a can of spray paint can do!
An old vase, picture frame, lamp base, planter, basket, or small decorative item can look completely different with a fresh coat of paint.
Choose a colour that works with your current decor, or go with a classic neutral like white, black, or a soft beige. You may be surprised by how different an old item can look after a simple makeover.
Just make sure the item and paint are compatible and use spray paint safely according to the product directions.
2. Bring the Outdoors In
Nature is one of the best, and cheapest, ways to decorate your home.
Look around your yard for interesting branches that can be arranged in a large vase. Add fresh greenery to small vases or jars, or use seasonal flowers to add a little colour to a room.
You can also use things like pinecones, interesting stones, or other natural objects as decorative accents.
A simple branch in a pretty vase can make much more of a statement than you might expect!
3. Rearrange Your Furniture
Before buying anything new, try moving your furniture around.
Move a chair from one room into another. Try your side table beside the sofa instead of the bed. Switch the direction of your furniture or create a new conversation area.
You might find that your existing furniture works perfectly in a different arrangement. And the best part? It costs absolutely nothing!
4. Shop Your House
This is one of my favourite ways to decorate on a budget.
Walk through your home and look at your belongings with fresh eyes. Could the vase in your bedroom work in the living room? Could the basket in the bathroom hold blankets? Could a piece of artwork from one room look better somewhere else?
Move decorative items between rooms and see what happens.
Sometimes something feels "old" simply because we've been looking at it in the same spot for years.
5. Get Crafty with Fabric
Have fabric scraps, old curtains, scarves, tablecloths, or clothing that you're no longer using? You might be able to turn them into simple decorative pieces.
Use fabric to make a table runner, pillow cover, placemats, bunting, or even a small piece of wall art.
You don't need to be an expert sewer, either. There are plenty of simple projects that require very little fabric or sewing. Fabric glue might even work!
6. Give Your Picture Frames a New Job
Have a collection of picture frames sitting around that aren't being used? Put them to work!
Frame family photos, children's artwork, scrapbook paper, pretty fabric scraps, postcards, calendars, or even pages from an old book.
You can also group several frames together to create an inexpensive gallery wall.
Don't worry if the frames don't match perfectly. A collection of different frames can actually make a display feel more interesting.
7. Use Old Things in New Ways
One of the easiest ways to decorate without spending money is to stop thinking about things only for their original purpose.
An old mason jar can become a vase, bathroom storage container, or pencil holder. A wooden crate can hold magazines, blankets, or toys. A pretty bowl can become a catch-all for keys and other little items. An old tray can organize perfumes, candles, or coffee supplies.
Look at what you already own and ask yourself: "What else could I use this for?"
8. Decorate with Books
Books can be beautiful decor all on their own.
Stack a few books on a coffee table or side table and place a vase, candle, or small decorative object on top. You can also use books to add height to displays or create little groupings on shelves.
If you have old books that are no longer useful to you, there are plenty of creative craft projects you can make with them, too.
9. Display Your Kids' Artwork
Kids create an endless supply of free artwork!
Instead of putting everything on the fridge, choose a few favourite pieces and display them around your home. Frame artwork, create a rotating gallery wall, hang drawings from clips, or turn colourful pieces into homemade banners. You could even laminate particularly sturdy artwork and use it as placemats.
It's inexpensive decor, and much more meaningful than something you picked up at a store.
10. Rearrange Your Shelves
Sometimes your shelves don't need new decor. They just need a new arrangement.
Take everything off a bookshelf, hutch, or display shelf and start from scratch. Group similar items together, mix different heights, add books for dimension, and leave some empty space.
You'll be amazed at how different the same collection of objects can look when rearranged.
11. Make a New Gallery Wall
Take a look through the artwork, prints, calendars, postcards, children's artwork, and photographs you already have.
Choose a collection that works together and create a new gallery wall. You don't necessarily need matching frames. In fact, mixing frames can give the display more personality.
And if you already have a gallery wall, try rearranging the pieces into a completely different configuration.
12. Switch Out Your Textiles
You don't need to buy an entirely new set of decor to make a room feel different.
Move throw blankets and pillows between rooms. Bring out a tablecloth you haven't used in a while. Fold a colourful blanket over the arm of a chair.
Even small changes to textiles can make a room feel refreshed.
13. Create a Decorative Tray
Do you have an unused serving tray hiding in a cupboard? Pull it out and turn it into a little decorative display.
Add a candle, vase, small plant, favourite book, or another decorative item you already own.
Trays are especially useful because they make a collection of random objects look intentional and organized.
14. Make a Simple Centrepiece
You don't need an expensive floral arrangement to create a pretty table centrepiece.
Try filling a bowl with pinecones, fruit, ornaments, or other seasonal items you already have. A vase filled with branches can also make a beautiful centrepiece. Even a few candles grouped together on a tray can create a simple focal point.
15. Move Your Decor Around Seasonally
One of my favourite ways to make my home feel different without buying anything is to rotate what I already own.
Pack away some of your decor for a few months and bring out things you've forgotten about.
When you see those pieces again, they can feel almost new!
You don't need a huge collection of seasonal decor, either. Simply rotating pillows, blankets, artwork, vases, and small decorative pieces can make a big difference.
Before You Buy Anything, Shop Your Home
The next time you feel like your home needs a refresh, resist the urge to immediately start shopping.
Instead, take a walk through your house.
Open the cupboards. Look in storage bins. Check the basement. Look at your bookshelves and closets. You might already have everything you need to create the change you're craving.
Decorating doesn't always mean buying something new. Sometimes the best way to refresh your home is simply to use what you already have in a new way.
And if you're trying to save money, that's a pretty great decorating strategy!
How do you decorate your home on a budget? Do you have a favourite way to refresh a room without buying anything new?
If you've ever planted lemon balm, you already know that it doesn't exactly need much encouragement to grow. This fragrant perennial herb can quickly become thick, bushy, and very abundant.
The good news? There are plenty of ways to put all those fresh leaves to use.
Lemon balm has a lovely lemony scent and a mild citrus flavor that works really well in drinks, desserts, fruit, homemade infusions, and even your summer bath. It's also an easy herb to grow, making it a great addition to a backyard herb garden.
If you're wondering what to do with lemon balm, here are 10 simple and clever uses for lemon balm:
1. Add It to Your Outdoor Space
Lemon balm is often grown for its lemony fragrance, and having it near your patio or outdoor seating area can be a lovely way to enjoy the scent while you're outside. It may also be useful for warding off mosquitos!
I like growing lemon balm in a planter near our patio table where I can easily snip a few leaves whenever I want to use them.
Tip: Lemon balm can spread quickly in the garden, so growing it in a container can make it much easier to keep under control.
2. Make Lemon Balm Simple Syrup
One of my favorite summer uses for lemon balm is making a batch of homemade simple syrup.
You'll need:
1 cup packed fresh lemon balm leaves
1 cup water
1 cup sugar
How to make it:
Combine the lemon balm, water, and sugar in a small saucepan.
Bring the mixture to a boil and cook for about 1 minute, stirring until the sugar dissolves.
Remove from the heat and cover.
Let it steep for about 30 minutes.
Strain out the lemon balm leaves.
Store the syrup in the refrigerator.
Use your lemon balm simple syrup to sweeten lemonade, iced tea, sparkling water, or homemade summer drinks. You could even use it to add a little extra flavor to cocktails or mocktails.
3. Make Lemon Balm Tea
Fresh or dried lemon balm leaves can be used to make a simple herbal tea.
Just add a handful of fresh leaves or a small amount of dried lemon balm to a mug or teapot, cover with hot water, and let it steep for several minutes. Strain and enjoy warm.
Lemon balm has a naturally mild, lemony flavor, so you can enjoy it on its own or combine it with other herbs such as mint.
4. Make Lemon Balm Infused Honey
Lemon balm and honey make a delicious combination.
To make infused honey, loosely fill a clean jar about halfway with fresh lemon balm leaves. Pour honey over the leaves until they're completely covered.
Let the mixture infuse for several weeks, then strain out the leaves.
Use the finished honey to sweeten tea, drizzle over yogurt, or add to desserts.
Important: Never give honey to babies under one year old.
5. Add It to Desserts and Fruit Salads
Lemon balm's subtle citrus flavor makes it a fun addition to summer desserts.
Finely chop a few fresh leaves and add them to:
Fruit salads
Yogurt
Parfaits
Fruit crisps
Pies
Homemade popsicles
You don't need much. A few chopped leaves can add a surprisingly nice lemony flavor.
6. Add It to Iced Tea
Summer and iced tea go together perfectly, and lemon balm is an easy way to switch things up.
Add a handful of fresh lemon balm leaves to your favorite iced tea while it steeps. You can also combine it with fresh mint for an extra refreshing flavor.
If plain water gets a little boring, try adding fresh lemon balm.
Add a few washed lemon balm leaves to a pitcher of water along with your favorite fruit. Lemon, lime, strawberries, cucumber, peaches, and berries are all great options.
Let everything chill in the refrigerator for a few hours so the flavors have time to mingle.
It's a simple way to make everyday water feel a little more special.
8. Use It in a Homemade Bath
Want to make your next bath feel a little more relaxing and spa-like?
Add fresh lemon balm leaves to the water for a lovely herbal scent.
You can sprinkle the leaves directly into the tub, or place them in a small cloth bag or reusable tea infuser and hang it near the faucet so the warm water runs through the leaves as the tub fills.
9. Freeze Lemon Balm for Later
If your lemon balm plant is producing more leaves than you can use, don't let them go to waste!
Wash and dry the leaves, then chop them and freeze them in small portions. You can freeze them in ice cube trays with a little water and then transfer the frozen cubes to a freezer bag.
Drop a cube into iced tea, lemonade, sparkling water, or other summer drinks whenever you need a little lemony flavor.
Freezing is a great way to preserve some of that summer herb garden abundance.
10. Make a Lemon Balm Sugar
Here's another easy way to preserve the flavor of fresh lemon balm.
Place fresh lemon balm leaves and granulated sugar in a food processor and pulse until the leaves are finely chopped and incorporated into the sugar.
Spread the mixture onto a baking sheet and allow it to dry completely. Once dry, store it in an airtight container.
Use your lemon balm sugar to sweeten tea, sprinkle over fruit, or add a little citrusy sweetness to baking.
What to Do With All That Lemon Balm
One of the best things about growing your own herbs is that you don't need to use them all at once. When your lemon balm starts taking over the garden, harvest some for tea, freeze some for later, and use the rest to experiment with homemade drinks and desserts.
It's inexpensive, easy to grow, and surprisingly versatile. Which is exactly the kind of plant I love having in my garden!
If you grow lemon balm, what is your favourite way to use it? I'd love to hear your ideas in the comments!
If you love growing fresh herbs during the summer, you may already have spearmint, peppermint, or chocolate mint growing in your garden. Mint is incredibly versatile and can be used for everything from refreshing drinks and desserts to simple crafts and homemade household items.
But there’s another variety of mint that deserves a little more attention: apple mint.
Apple mint has a fresh, fruity scent and a mild minty flavour with a hint of apple. It looks similar to other varieties of mint, but its soft, slightly fuzzy leaves make it easy to distinguish. In late summer, it can also produce pretty reddish or pinkish flowers that add a little extra interest to the garden.
And just like other types of mint, apple mint is surprisingly useful around the house.
If you've recently picked up an apple mint plant and aren't sure what to do with it, don't worry. There are plenty of ways to use apple mint, from making refreshing summer drinks to adding it to desserts, salads, and homemade household items.
Growing Apple Mint
Apple mint is a perennial herb that can grow in full sun or partial shade. It prefers well-drained soil and regular watering, especially during hot, dry weather.
Like other mint varieties, apple mint can spread quickly, so you may want to grow it in a container if you don't want it taking over your garden. If you plant it directly in the garden, give each plant plenty of room to grow.
Because apple mint is a perennial, it can return year after year in suitable climates. If you're growing it in a container, however, you'll need to consider your local winter conditions and whether the plant can survive outdoors.
Once you have a healthy plant, you'll have plenty of fresh leaves to experiment with.
15 Ways to Use Apple Mint
Wondering how to use apple mint once your plant starts producing lots of fresh leaves? Here are 15 simple ideas to try.
1. Add Apple Mint to Tea
One of the easiest ways to use apple mint is to make a simple cup of mint tea.
Rinse a few fresh leaves, add them to a mug, and pour hot water over them. Let the leaves steep for several minutes, then remove them and enjoy. You can also combine apple mint with other herbs for different flavour combinations.
2. Make Flavoured Water
Apple mint is perfect for making plain water feel a little more special.
Add a handful of rinsed leaves to a pitcher of cold water along with sliced lemon, lime, cucumber, berries, or apples. Let it chill in the refrigerator for a few hours before serving.
3. Add It to Lemonade
Give homemade lemonade a fresh twist by adding a handful of apple mint leaves.
You can gently muddle a few leaves before adding them to the pitcher or simply use whole leaves as a garnish.
4. Make Mint Ice Cubes
This is a great way to use up extra apple mint.
Place small leaves into an ice cube tray, fill with water, and freeze. Add the minty ice cubes to water, lemonade, iced tea, or sparkling water.
They're also a simple and pretty addition to summer drinks when you're entertaining.
5. Add It to Fruit Salads
Apple mint pairs really nicely with summer fruit.
Try chopping a few leaves and tossing them with strawberries, watermelon, blueberries, peaches, pineapple, or cantaloupe. The fresh mint adds another layer of flavour to an otherwise simple fruit salad.
6. Make Apple Mint Syrup
Fresh apple mint can be used to make a simple syrup for drinks and desserts.
Just add 1 cup of water and 1 cup of white sugar to a saucepan. Heat over medium heat, stirring occasionally, until the sugar has dissolved. Remove from heat and add 1 packed cup of fresh apple mint. Cover and let the mint steep for 20 - 30 minutes. Strain the syrup through a mesh strainer, pressing gently on the mint leaves to release the liquid. Let the syrup cool completely before transferring it to a clean jar or bottle. Store in the refrigerator and use within about 2 weeks.
Use your homemade syrup to flavour lemonade, iced tea, sparkling water, mocktails, fruit salads, or desserts.
7. Add It to Desserts
Fresh apple mint makes a nice garnish for desserts.
Add a few leaves to ice cream, fruit crisps, cakes, cupcakes, pudding, or a bowl of fresh berries. You can also finely chop the leaves and experiment with adding a small amount to fruit-based desserts.
8. Make Minty Fruit Popsicles
Blend your favourite summer fruit with water or juice and add a few finely chopped apple mint leaves.
Pour the mixture into popsicle molds and freeze.
Watermelon and mint, strawberry and mint, or peach and mint are all refreshing combinations.
9. Add It to Salads
Don't limit apple mint to drinks and desserts!
Finely chop a few leaves and add them to green salads, cucumber salads, grain salads, or salads made with fresh summer vegetables.
10. Make Homemade Salad Dressing
Apple mint can add a fresh twist to homemade salad dressings.
Try combining chopped mint with lemon juice or vinegar, olive oil, and a little honey. You can adjust the ingredients to create a dressing that works with your favourite summer salads.
11. Add It to Marinades
Fresh mint can also be used in homemade marinades.
Try combining chopped apple mint with lemon juice, olive oil, garlic, and your favourite herbs and spices. It can work especially well with chicken, vegetables, or lamb.
12. Make Fresh Herb Butter
Soften some butter and mix in finely chopped apple mint along with a little lemon zest and salt.
Refrigerate it and use it on vegetables, corn on the cob, potatoes, or warm bread.
You can even freeze small portions so you have some ready whenever you need it.
13. Dry Apple Mint for Later
If your apple mint plant is producing more leaves than you can possibly use, don't let them go to waste.
Harvest the leaves and dry them using your preferred herb-drying method. Once completely dry, store them in an airtight container away from heat and direct sunlight.
Use the dried mint later for tea, cooking, or homemade herbal blends.
14. Make a Simple Homemade Air Freshener
Apple mint has a naturally fresh scent, making it useful for adding fragrance to your home.
Bundle a few stems together and hang them somewhere like a pantry, mudroom, or closet where they can dry naturally.
You can also place dried leaves in a small fabric sachet and tuck it into a linen closet or drawer.
15. Use Apple Mint in Summer Decorations
Apple mint is pretty enough to use as part of a simple summer centerpiece.
Add fresh stems to a vase with flowers, tuck a few sprigs around a serving platter, or place a small bunch beside each place setting.
It's an inexpensive way to add greenery and fragrance to your summer table using something you grew yourself.
More Ways to Use Apple Mint
If you have a really productive plant, don't stop at these 15 ideas. Here are a few more ways to use apple mint:
Add fresh leaves to iced tea.
Use it as a garnish for fruit platters.
Add chopped leaves to homemade salsa.
Mix it into a yogurt-based dip.
Add a few leaves to sparkling water.
Make mint-infused vinegar for salad dressings.
Add fresh mint to homemade fruit compotes.
Freeze chopped leaves in small portions to use later.
Add fresh mint to smoothies.
Use it to flavour homemade fruit sauces.
Don't Let Your Apple Mint Go to Waste
One of the best things about growing herbs like apple mint is that you don't need to use everything immediately. If your plant starts producing more mint than you can keep up with, harvest some and preserve it for later.
You can dry the leaves, freeze them in ice cubes, or make something such as mint syrup that you can enjoy after the growing season is over.
So the next time you see apple mint at your local garden centre, don't overlook it. It's a pretty, useful herb that can provide you with fresh flavour, fragrance, and lots of inexpensive ways to enjoy what you've grown.
And if you're already growing apple mint, hopefully these 15 ways to use apple mint have given you some new ideas for putting that plant to good use!
Trying to organize your home without spending a fortune? You're not alone. Keeping your space tidy and clutter-free doesn't have to mean investing in expensive storage systems or custom organization solutions. In fact, some of the best organizing products are surprisingly affordable.
In a world where clutter seems to multiply overnight, having the right tools can make a huge difference. Whether you're organizing a small apartment, a busy family home, or simply looking for ways to make everyday life a little easier, affordable organizers can help you maximize your space while staying within budget.
From kitchen cabinets and bathroom counters to closets and entryways, budget-friendly organization products offer practical solutions for every room in your home. The best part? You don't have to spend a lot to get organized.
Below, you'll find 12 affordable organizers available on Amazon for $25 or less. These clever storage solutions can help reduce clutter, simplify your daily routine, and make your home feel more functional, all without breaking the bank.
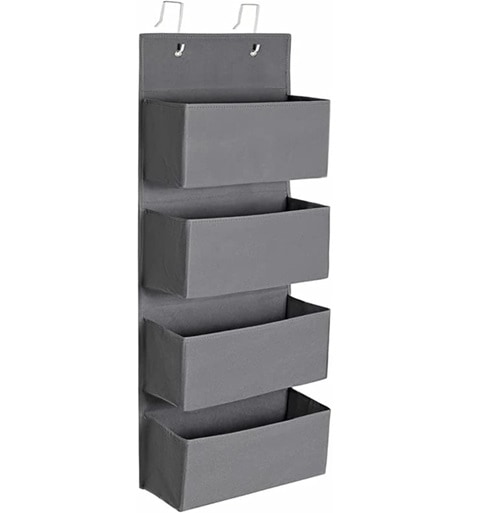
I think one of these over the door organizers would be perfect for those kids who love knick knacks! Or for holding baby supplies. The option are endless, really. See it on Amazon.
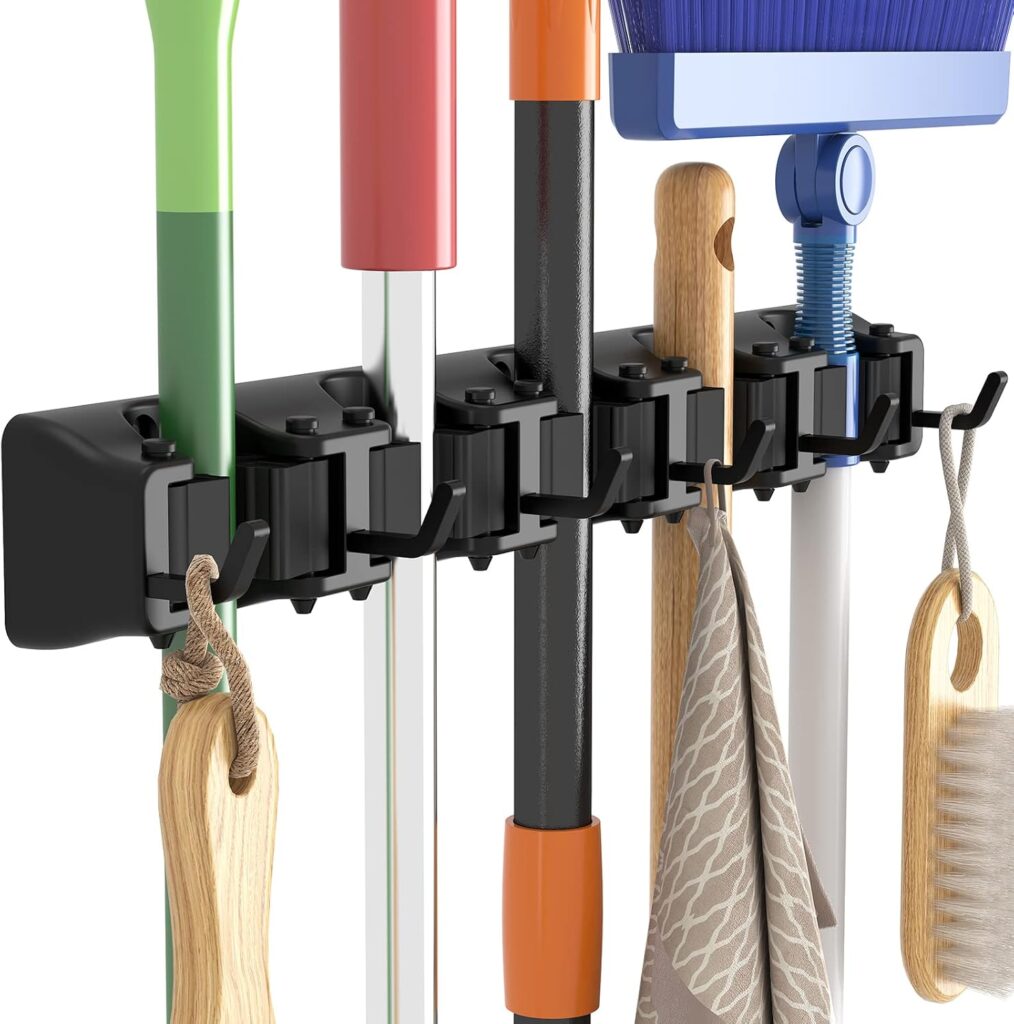
We have something like this in our garage to wrangle the mop and brooms and I love it! This one from Amazon looks even better than what we have. I like that it has small hooks for hanging other small things! See it on Amazon.
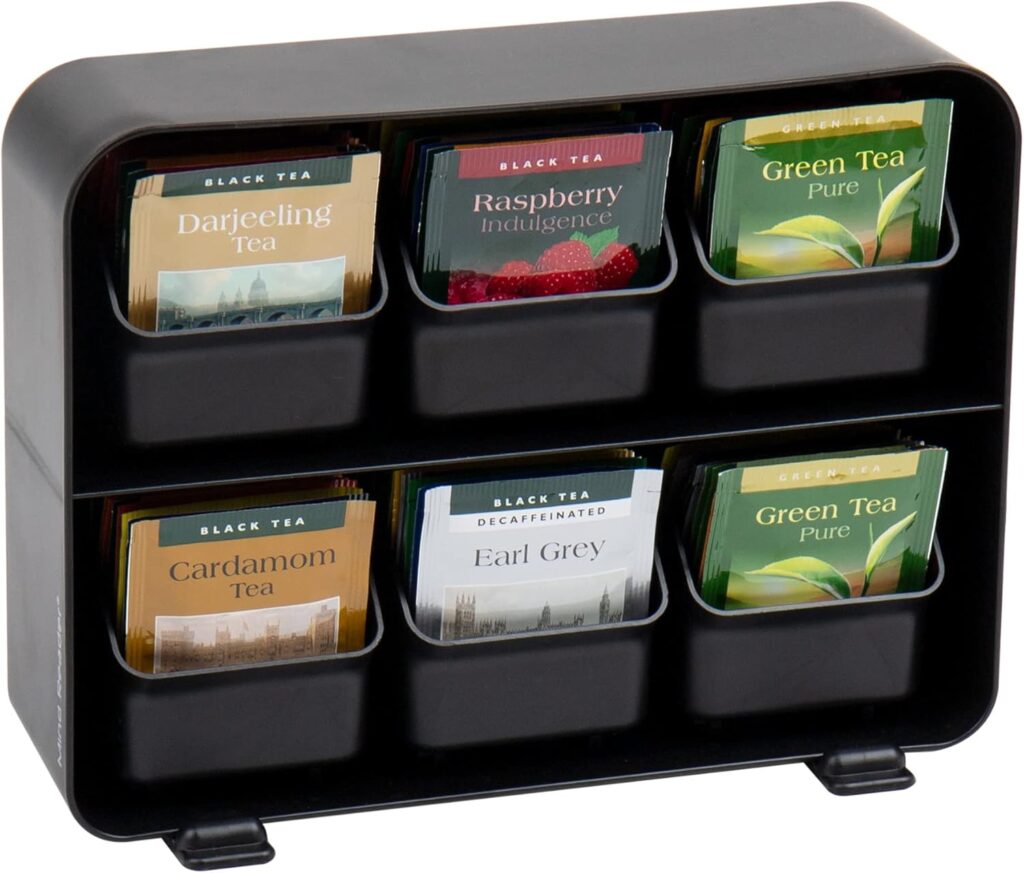
If you have tea drinkers in your home, this tea bag organizer is going to be so nice to have! Say goodbye to stacking boxes that you have to individually move to get to the flavour you really want! See it on Amazon.
If you are short on space in your closets, these pant hangers could free up a lot of space for you! There are ones especially for skirts too. See it on Amazon.
This is advertised as a shoe organizer, but I think this you could store so many different things in one of these! May hair care, toys, gift wrapping supplies, office supplies and so much more! See it on Amazon.
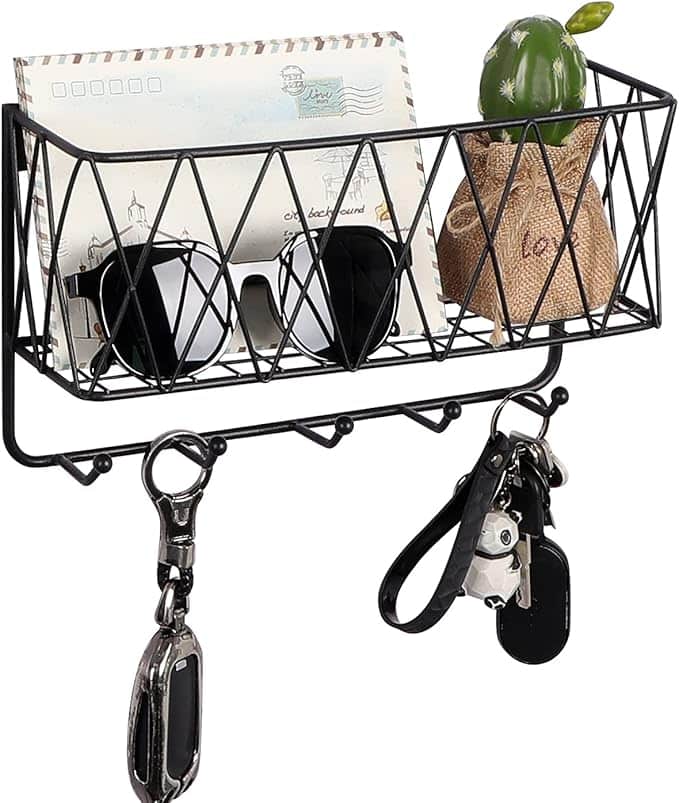
This organizer would make a great addition to any entryway or kitchen. Use the hooks to keep track of car keys, spare keys, and other small items, and use the main compartment to keep track of your mail. See it on Amazon.
I have these all over our house! I've got them in our bathroom drawers, kitchen, the girls' craft desk... they are so good! These are interlocking and I find they slide around less than ones that aren't interlocking. See it on Amazon.
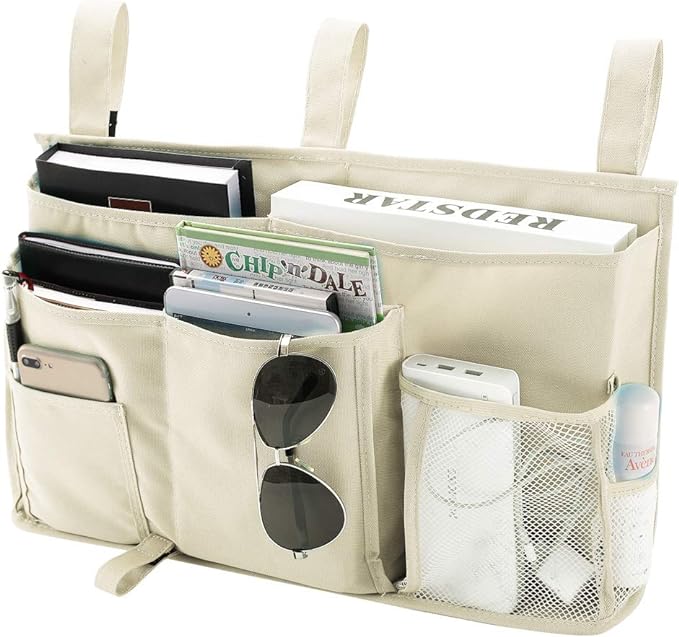
This is the first time I have seen one of these, but instantly I knew it could be very useful! My youngest has a bunk bed in her room and I like that she could have a place to put her water bottle, books and knick knacks. See it on Amazon.
I have a couple of these in our fridge. One holds yogurt cups and the other holds apples/oranges. I love that these ones have removable dividers, making them great for organizing snacks in the pantry. See it on Amazon.
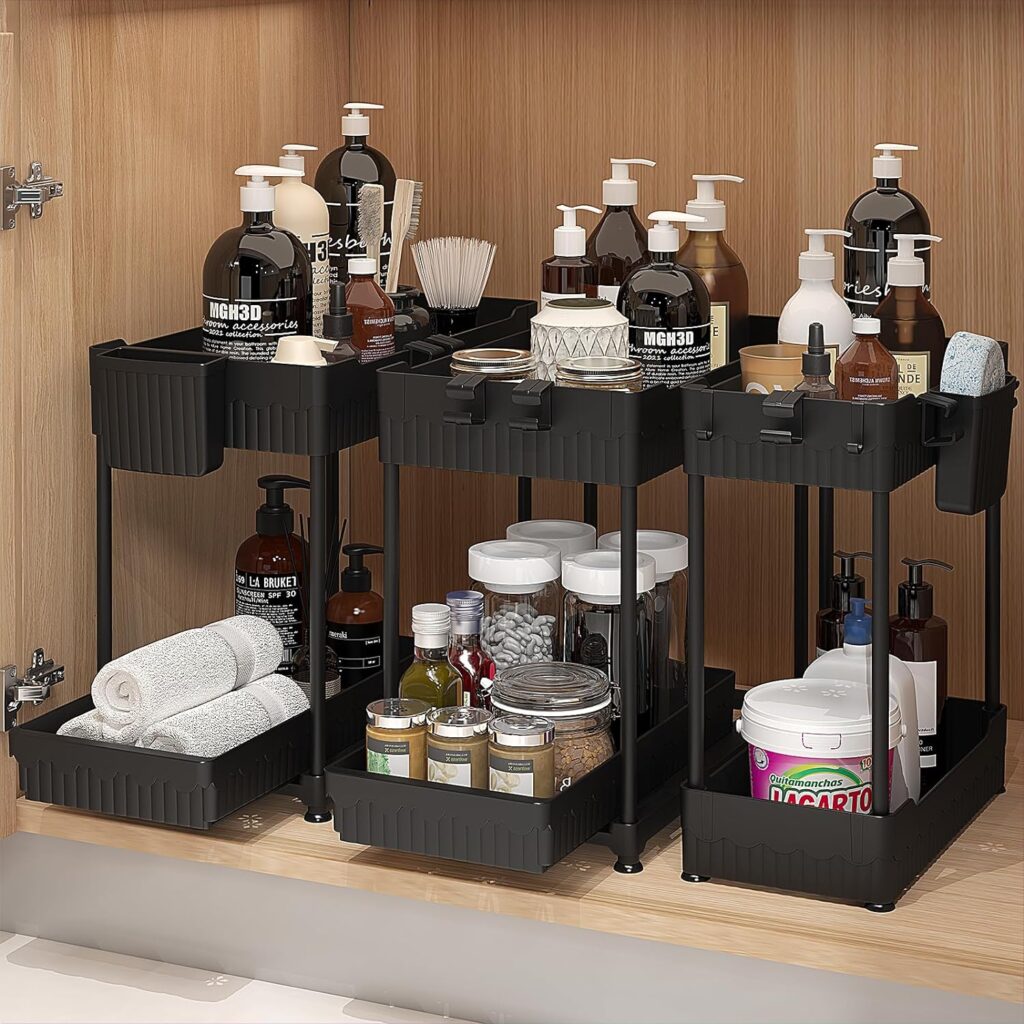
These 2 tier under sink organizers are brilliant! I have one under our kitchen sink and one in each of the bathrooms! Highly recommend! This is a two pack on sale! See it on Amazon.
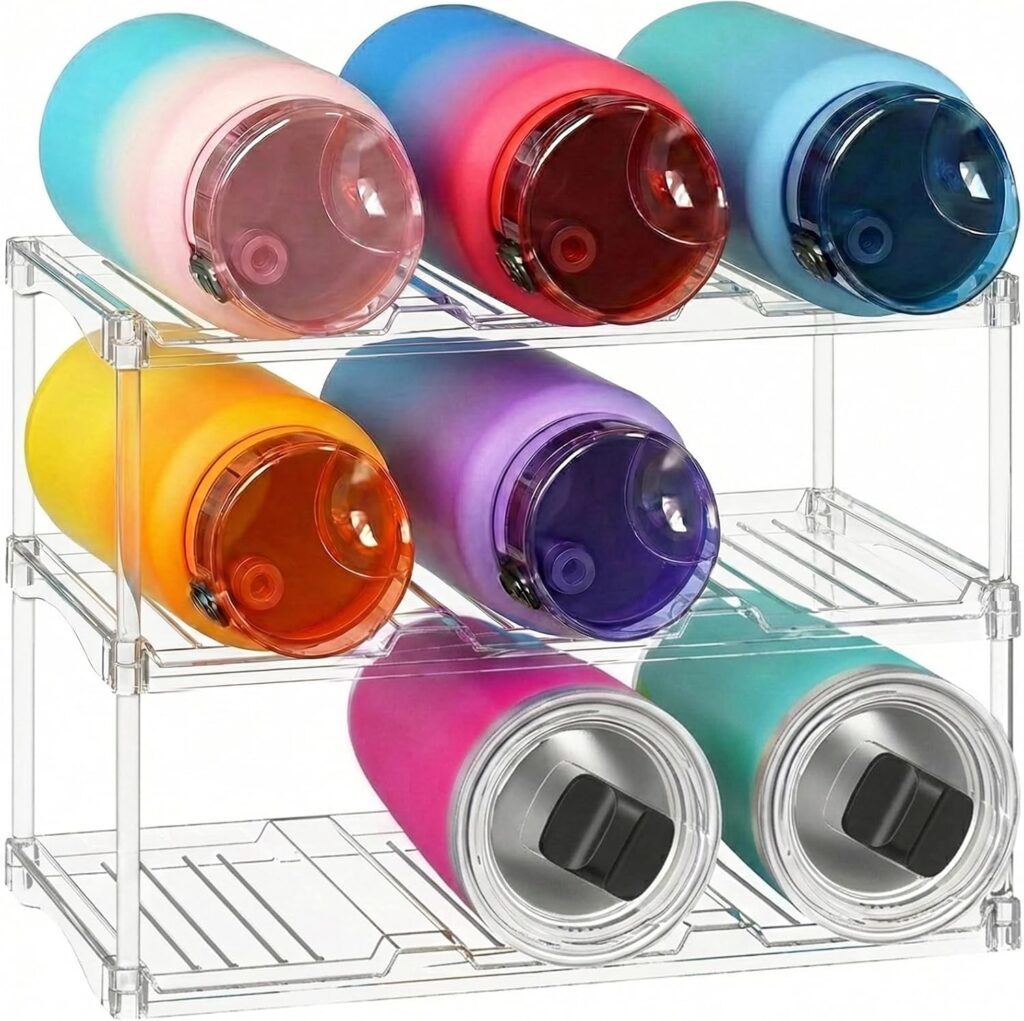
How amazing would these be for easy access of all the water bottles and travel mugs? No need to take everything out just to get the bottle you're wanting. See it on Amazon.
Getting organized doesn't have to come with a big price tag. With the right affordable organizers, you can create a more functional, clutter-free home while sticking to your budget. Whether you're tackling overflowing closets, messy kitchen cabinets, or crowded countertops, these budget-friendly storage solutions can help you make the most of your space. Start with one or two organizers that solve your biggest pain points, and you'll be surprised at how much easier daily life can become when everything has a place.
Want to see more of my affordable organization picks from Amazon? Visit my Amazon storefront to see more than 50 recommendations! (Not every item is under $25 though.)