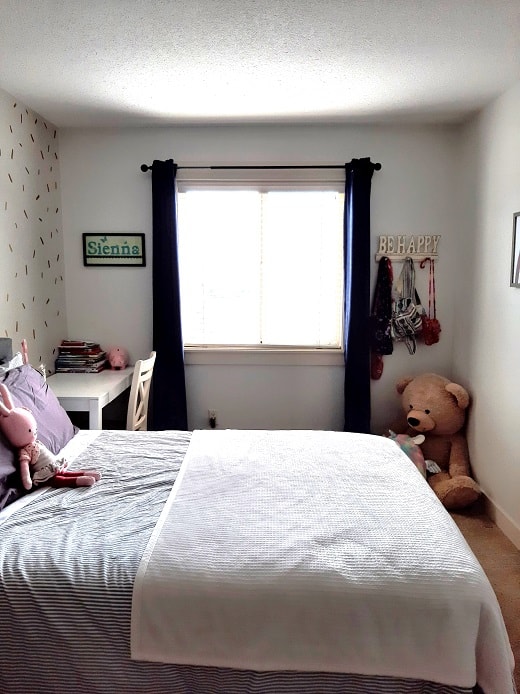
My daughter tuned 10 (!!!) this year and really wanted a more grown up bedroom. One where she could just hang out on her own or with friends comfortably.
BeforeAfter
It was a project that took so long just to get started, but once we actually did start, it only took about a week to finish.
She knew she wanted to change her pink walls to gray walls. Her favourite colour is purple so I suggested doing her back wall a deep purple of some sort, but she was adamant that all her walls had to be gray.
So I headed to Pinterest to find inspiration. I was trying to find a warm gray that she loved and we finally settled on Classic Gray by Benjamin Moore. Her back wall is actually a darker gray, Revere Pewter by Benjamin Moore.
While I used colours from Benjamin Moore, I always buy any paint for a project from The Home Depot. I like their paint and I find it less expensive than Benjamin Moore paint.
I sort of wish the back wall was darker, but she loves it. Especially with the sprinkle decals that we bought.
Originally, I thought doing that feature wall in a fun peel and stick wallpaper would be a great way to add character to her room. But then I priced it out... Going that route was not in the budget. LOL. So I eventually thought to check out Etsy for wall decals. I found the fun sprinkle decals that she loved in gold. Waaay more budget friendly. (I'll give links and cost below for everything.)
The most expensive part of her room was her new bed. Everything is new there. The frame, mattress and bedding. We felt it was important to give her something that could last her for a very long time. (But I still got the deals!)
As for the other furniture, her dresser is a family antique that we've had forever. Her desk was a present for her birthday from her Oma and Grandpa, as was the nightstand.
I wanted to replace her curtains with some deep purple ones, but apparently she has an attachment to her navy ones. Haha. I'm, okay with that! This is a room made for her and not the design books!
In between the artwork, I am going to hang her ukulele once I get a hook.
Cost Breakdown and Sources:
Paint: $100 for 2 gallons from The Home Depot Paint colours: Benjamin Moore Classic Grey and Revere Pewter Gold Sprinkle Decals: $25 for 279 decals Desk: Ikea desk bought second hand for $50 Desk chair: Free, it's one we had around the house already Nightstand: Made by a family member years ago, but gold knob was added. (It was a gift for my daughter so I'm not sure how much the knob was.) Bed Frame: $303.31 for full size. (Not on sale anymore, but this is a solid bed!) Mattress: $289.99 Duvet Cover Set: $64.99 Purple Pillow Cases: $16.99 Sheets: $24.99 for full size white sheets Mattress Protector: $27.99 Art work: All bought years ago from Homesense so I can't link it unfortunately.
Grand total: $903.26I still need to buy her a lamp and maybe something for over her bed, but that will happen one day.
If you have ever watched any home decorating show you have probably seen the amazing homes showcased. It's easy to get caught up in the fact that your home might not look so professionally done. However, you can have a beautiful home that is stylish and done on a budget! With nearly any budget you can make your home stylish and welcoming. Also keep in mind that simple, timeless decorating is typically what looks the best in any home.
Paint
Purchasing paint is fairly inexpensive and can change-up the look of any room. If you are ready for a change and don't have a lot of money, consider painting. Even just painting an accent wall can turn any home from dull to very hip and stylish! Don't be afraid to try out different colors. Most paint stores will give you little amounts of paint to take home to try out.
Rugs
One way to bring drama or simple coziness to a room is by adding rugs. However, you don't have to go out and pay for expensive rugs. In fact places like Amazon, Wayfair, Walmartand Home Sense are all great places to find very large and beautiful rugs on a budget. Try to pick out a rug that adds color as you can find other accents based off of the colors in the rugs. If your rug has some red and purple in it, look for red and purple throw pillows for your couch.
Lights
Lighting can make or break any room. You want to make sure you have the right amount of lighting for tasks and ambiance. Don't be scared of trying out different lamps. Adding some pretty lamp shades, stand up lamps or even recessed lighting can turn your room into a stylish one.
Wall Art
There are different price ranges when it comes to wall art. You can really dig into the bank account and hit up a gallery or you can go the more budget friendly route. Look for wall art at garage sales, discount stores and even at your local mall. You can also just make your own wall art with family pictures blown up onto canvas. Or, make a beautiful printable and frame it. Wall art is an area you can really get creative since it isn't permanent.
Decor
Using decor to bring some style to a room is easy and affordable. In fact just adding in some simple things like throw pillows, inexpensive curtains, candles and plants can really liven up any room. You can find these items at second-hand stores, garage sales or re-purpose what you already own.
How are your creating your stylish home on a budget?
Got a big, bare wall staring you in the face? Don’t rush off to the store or even the interior decorator just yet. You can make your own custom wall art that will fit your needs, satisfy your desires and cost next to nothing.
Don’t worry, you don’t have to be talented, crafty, or even coordinated. All you need are a few supplies, some time, and a little bit of creativity. We’re talking bare minimum creativity, and if you’re not confident that you can supply even the tiniest creative spark, borrow someone’s child for the day. One way or another, you’ll be able to make great wall art with a small amount of effort and an even smaller budget.
Project 1: Living Large in the Living Room
You need something to stare at besides the TV, right? Well, that demands a pretty big piece of wall art if it’s going to compete with today’s huge flat screens. Get ready to create your own painted canvas to display in your living room. Your friends and family will be impressed with your artistic talent and ingenuity, but all you have to do is follow these simple steps:
Buy a large artistic canvas, 2-3 colors of acrylic paint, painter’s tape, and a drop cloth or tarp if you don’t already have one. The expensive item here is going to be the canvas, but it’s still a lot less expensive than buying prefabricated art.
Decide which color you’d like to show underneath the tape – if it isn’t white, then paint your canvas all over and wait for it to dry. If you like white, skip to the next step.
Lay the painter’s tape across the canvas in diagonals, making sure that each piece of tape is long enough to extend past the edges of the canvas. You can create shapes between the pieces of tape – triangles are easy and make for a nice modern art appeal.
Once your tape is in place, decide which segments you’d like to paint in each color. Two contrasting colors create a stark and interesting effect, while colors from the same family soften this piece of art. Start painting and try not to get both colors in the same section, or you’ll lose the segmented effect.
Wait for the paint to dry, then peel off the tape and touch up any irregular spots. Hang your new wall art and enjoy the compliments from your family and friends.
Project 2: Kitchen Wallflowers
It can be difficult to decorate a kitchen, so many people just leave it as a functional room. Don’t fall into this rut – make your kitchen fabulous with simple but beautiful wall art.
Find or buy a large empty frame from an antique store.
Collect tin cans until you have four or five, then remove the labels by soaking the cans and using nail polish remover to get rid of any residue.
Hang the frame in your kitchen, then position the tin cans inside it and nail them to the wall in a neat line, leaving as much space above them as possible.
Fill your tin cans with fresh flowers in spring and summer, twigs and colorful leaves in the fall, and holly and berries in the winter.
Project 3: Entryway Showstopper
Make a place to hang your keys and show off your artistic side with this piece of wall art. Your friends and family will be amazed to see something you made with such lovely form and helpful function.
Snag an old window shutter from an antique store, thrift store or from your garage. You can also raid friends’ garages or hunt for one if you have a family farm.
Either decide that you like your shutter as is or paint it to go with your entryway décor.
Nail your shutter horizontally onto the wall, then add some nails on the bottom edge to hang your keys.
Insert favorite photos or postcards between the slats.
Appreciate your handiwork.
See how easy and affordable it is to create your own unique wall art? With just a few supplies in hand, you’ll be well on your way to solving your blank wall dilemmas.
I’d love to hear your ideas for decorating blank walls on a budget. Let me know in the comments!
Do you want a fresh look for your space but don’t want to go broke making it happen? If so, take a look at these ways to decorate with things you already have! I find that once February comes (or once I've had enough of the dreary winter weather), I want to freshen things up inside. Make things brighter if you will. Chances are, with these tips, everything you need is right under your own roof; you just need to get creative with it. Here are some helpful tips to get you started decorating with the things you already have!
How to Decorate with Things You Already Have
1. Get savvy with spray paint.
Just about anything can achieve a fresh new look when you give it a coat of spray paint. Paint vases, lamp bases, small furniture pieces, even glassware knick knacks. Choose a color that goes with your color scheme or opt for fresh white. It's sure to look like a whole new piece!
2. Bring the outside in.
Arrange some long branches in a vase for a pop of rustic charm. Fill bud vases with flowers and fresh cut greenery. You can even paint rocks or pine cones to use as bowl fillers. Nature provides so much beauty, find ways to bring it indoors!
3. Get crafty with fabric.
Take fabric scraps or old clothing pieces to use as the makings for runners, throw pillows, place mats, and more. You only need a little fabric and some simple stitchery to make these items happen, so why not give it a shot?
4. Get creative with picture frames.
Do you have tons of picture frames around your home? Use them to frame photos, artwork, colorful fabric scraps, scrapbook paper and more. You can even use them to frame electrical outlets.
5. Use old things in new ways.
Use that old mason jar as a cotton ball holder in the bathroom, or an old fruit crate for magazines. Using items in ways other than for what they were intended is so fun and functional.
6. Get budget savvy with books.
Books can be stacked up to create some visual interest on end tables and coffee tables. You can even frame old pages of books, make bunting banners, or use them as trinket boxes when you carve out the center of them.
7. Let kids get creative.
Display children’s school and art work in fun and decorative ways. Create banners with it, frame it, or laminate it and use as place mats, runners, and more.
See how simple it can be to decorate your home with things you already own? Give these tips a try and see how budget savvy and beautiful your space can be.
It's finally finished! And I'm anxious to show you the room we created for our baby. Keep in mind that I like simple and minimal so it may be boring to some of you! I had a lot of fun doing this because I have a bit of an interior decorating background and hadn't really done any designing for a long time! Decorating to me these days, is about creating a comfortable room that is done on the cheap. That means I DIY'd and repurposed quite a few items to create our baby room on a budget! Oh, and since we didn't know the gender of our little one, I tried to make it as neutral as possible.
At the end of the post I'll have a source list with our approximate costs and links to my crafty projects 🙂
The curtain fabric that inspired the colours in the room:
I'm quite pleased with how it turned out. 🙂 We obviously decided to forgo a rocking chair due to space restrictions since we have the single bed in there. We traded our double bed for a single bed my parents had since they couldn't store all the beds! I was going to buy one of those thick changing pads to put on top of the dresser, but decided that the bed could work just as well.