Sep 27 | Easy DIY
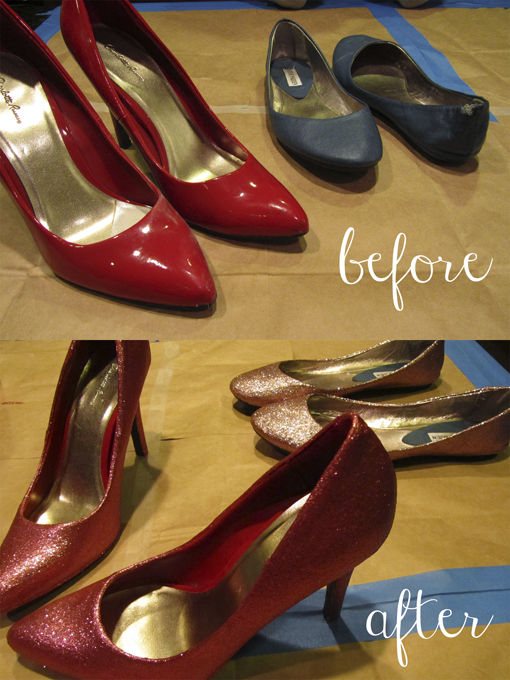
I think that creating these DIY Glitter Shoes is a wonderful and fun way to transform an old pair of shoes!
See the full instructions over at Simply Whisked!
Have you got a frugal DIY idea that you’d love to share with others? Submit your idea here!
Sep 23 | Easy DIY
I love this dollar store craft caddy and it’s such an easy project to put together! You could buy one that will set you back about $10 or you could have fun and whip one up in no time and paint it in any color to suit your taste! Not only is it good for organizing craft supplies, I think it would be very handy for BBQ’s, picnics and outdoor entertaining events to hold cutlery! You could even put the caddy to use organizing stationary supplies on a desk, in the shed for small tools and for holding makeup brushes. Really, the uses are endless!
Dollar Store Craft Caddy

Here’s how to make this easy Dollar Store Craft Caddy:
SUPPLIES:
- 4 wire/metal pencil holders (found in office supply section at Dollar Tree)
- Ribbon or twine
- Hot glue, glue gun
- Spray paint in choice of color and finish

DIRECTIONS:
1. Begin by placing the wire pencil holders on a piece of newspaper. Spray on 2 coats of spray paint in your choice of color or finish. Allow to dry for one hour.
2. Cluster the four pencil holders in a group. Press them close together so they touch. Wrap a length of twine or ribbon around the holders.
3. Add some hot glue where the holders touch. Just a small dab will do and will help keep the foursome together. You can also add a dab or two under your length of ribbon.
4. Tie the ribbon or twine in a knot securely.
5. You can now add your crafting supplies to each cup and display for use.

May 30 | Money Saving Tips, Easy DIY

It doesn’t matter what time of year it is, there always seems to be gifts to wrap for one occasion or another! I know that I happen to enjoy when I’m given a gift and I can tell the gift giver spent a little bit of time making the wrapped gift look beautiful. Interesting wrap does two things:
- It gives the recipient of a gift the feeling that the giver went the extra mile.
- Even though wrapping paper generally gets ripped to shreds, it add more suspense to the surprise.
So when it comes to your loved ones, friends, or even business associates on any special occasion throughout the year, think twice before you settle for some cheap wrap from the dollar store. Think outside the box!
The truth is, there are plenty of recyclable materials around that make crafting your own wrap easy with barely any cost. Wrapping can even become great projects for kids. Take a look at these recyclable ways to wrap gifts:
- Flowers or flower petals. How awesome and sweet smelling would this be!

- Old family photos you don’t want anymore.
- Photos printed out from a digital camera.
- Old posters are great for wrapping.
- Leaves. New or just fallen there’s no cost, no problem finding them (depending on the time of year), and they are biodegradable.
- Old mail: Most of it goes into the recycling bin but there could be some great pieces to cover a gift. For example, make an envelope for a check out of old bills!
- A collage from newspapers and magazines.
- Cereal boxes: remember the prize in the box when you were a kid!
- Old fabrics, cloths or clothes the recipient of the gift can reuse or donate.
- Toilet and paper towel rolls. Cut up and paint them creating an unusual texture with their cylindrical shape.
- Tea bag wrappers. Tape them over the box of a new kettle.
- Carpet samples or leftovers from an installation make a furrier presentation.
- Old cassettes: stack and glue them together making a box for a gift.
- Reuse old greeting cards.
- Egg cartons. Need I say more? Paint them, glitter them, just go wild with them.
- Old sheet music for a musical surprise. You could even write out a song as part of the gift.
- Paper bags can go a long way when wrapping.
- Milk or juice cartons: wash out, decorate and use them as a gift box.
- Maps. These can be great for travel related gifts like a new bike helmet or backpack.
- Scraps from a wood shop, metal shop, or printing company. There’s usually a lot of waste at these venues that can easily be converted into something useful like wrapping up a gift.
While some items listed above are simple to use as the main wrapping material others may need some help being attached. If you’ve chosen one of the latter here’s a suggestion:
- First use newsprint or other recyclable material to encase a gift. Older used wrapping paper will also do and it’s the perfect time to recycle it.
- Apply the chosen material such as flower petals, leaves, or photos with, glue, tape, or string, as you see fit.
Good luck gifting, wrapping, and making others happy! Do you have any other creative wrapping ideas to share?
Sep 23 | Easy DIY
Frugal Fall Bracelets

If you are looking to warm up your wardrobe this fall, these frugal fall bangles are perfect. Easy to make and inexpensive too, they are fun to make during a girl’s night or when you are just in the mood for a fun DIY. Here is how a trip to the craft store and a few basic crafting supplies can help you get the job done!

SUPPLIES NEEDED:
- Assorted bangles (plastic, metal, wood all work well)
- Assorted twine, ribbon, yard, or even burlap strips
- Scissors
- Hot glue, glue gun

DIRECTIONS:
1. Cut a long length of ribbon/twine/burlap of your choice.
2. Add a tiny dab of hot glue to the end. Press it to the inside of the bangle. Hold in place until secure.
3. Start wrapping the piece around the bangle. Pull tightly as you do to avoid wrinkles or bulkiness. Lightly overlap as you wrap.
4. Once the bangle is covered, cut the ribbon/twine/burlap to fit. Add a dab of glue and press to the inside of the bangle. Hold in place until dry.
If you wish, you can cover the entire bangle. Or, like we did with the gold bangle, leave part of it exposed. The contrast in colors and textures is actually quite pleasing!
Gather your supplies and give these easy frugal fall bangles a try. They are simple to make and easy to enjoy!
Apr 27 | Easy DIY
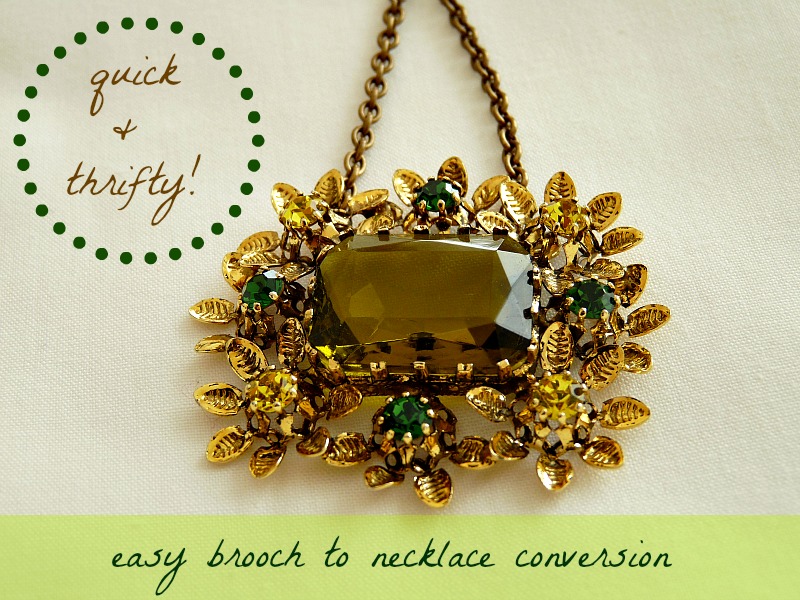
When Tanya from Dans Le Lakehouse found a pretty (but broken) brooch for 25 cents at a yard sale, she knew she could do something with it. With some chain, two split rings and needle nosed pliers, the broken brooch became a pretty necklace!
Check out her simple thrifty project here!
Have you got a frugal DIY idea that you’d love to share with others? Submit your idea here!
