Mar 25 | Household Tips

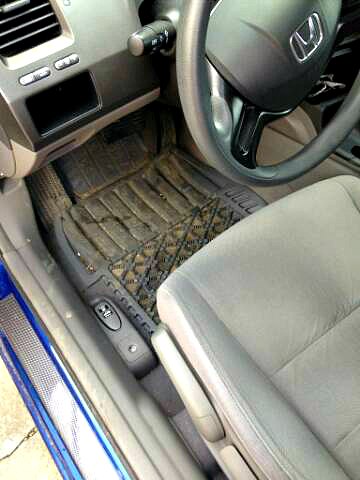
Well, our car is cleaner! It’s not perfect, but the stray toys, crumbs and dirt are gone! I didn’t get a chance to wash the mats so the mats still look quite dirty. Once it’s warmer, I intend on scrubbing the mats really well.
Here are the pictures for evidence:
After:

After, but the mats still look dirty!
Before:
Before:
Before:
How did you make out with today’s task? Let us know in the comments!
Mar 25 | Household Tips

Happy Tuesday! Are you ready to get your Spring Clean on? I am! For the next three weeks, I’m setting aside some time to complete one task a day to be on my way to a cleaner home. I’d love for you to join me!
Task 2
- Clean your Vehicle. Get rid of any garbage and items that don’t belong in the vehicle. Vacuum the seats and floors. Wash the outside of the vehicle if you want.
As I go along, I’ll be purging items that I see we don’t need or use anymore. I’ll either put them in a donation box or try selling them on a local Facebook Buy & Sell site.
Get your FREE printable checklist
I’ve put together a printable checklist for you to reference over the next three weeks. If you’re interested in getting this free printable, sign up here for the Spring Cleaning email list! Along with the printable, you’ll receive an email each day with that day’s task and my end of the day update. There will also be useful articles for Spring Cleaning thrown in. At the end of the challenge, I’ll also be putting together an ebook that you will be able to get access to if you’re signed up for the Spring Cleaning email list!
Will you be joining me today? If so, leave a comment below!
Mar 24 | Household Tips

I fully intended on getting this post up earlier today, but I completely misjudged how dirty my bags were! I had to stick them both in the wash and let them air dry so I didn’t ruin them.
And yes, I have two bags that I alternate. One is my big diaper bag that carry around anytime I have Sienna with me, so it gets used the most. My other “pretty” teal bag is one I take when I’m on my own and don’t need as much toddler paraphernalia.

Honestly, I was quite amazed with everything I had in both bags!

The old Cheerios, cracker, plastic spoon and expired coupon got thrown away and everything else I just organized back into my bags. The diaper bag has a tone of pockets inside which makes it great for storing all the little things. Also, can you believe I have a winning Roll Up the Rim from Tim Hortons?! It’s just a coffee, but I never win! I’ll have to redeem it before it’s too late.
I posted this picture to Instagram which is actually quite embarrassing. Are those leftover fries and raisins? ewww.

Here are the bags all clean. They even smell good 🙂 Now my grocery bags, notebooks, hand lotions, wallet, and snacks for Sienna and I are easier to find!

How did you do on today’s task? I’d love for you to leave a comment!
Mar 24 | Easy DIY, Household Tips

We’re kicking off the 3 Weeks to a Spring Clean Home challenge today, so I wanted to give a rundown of the cleaning tools and products that I use for cleaning my home naturally! While I admit I’m not 100% natural when it comes to cleaning, it’s still important to me to be as natural as possible. You will find Windex, store-bought laundry detergent and leather furniture wipes in my cupboards, but that works for me right now and I’m okay with that! However, I am working up the nerve to try homemade laundry detergent and I’d like to find a recipe for leather wipes. Windex will always be around because my husband likes it for the cars.
I have quite a few products that have become my favourites over the years and I want to give you an up close and personal look!

First up, the tools:
- Bucket. I use an empty ice cream bucket to fill with water and castile soap for cleaning the floors and walls.
- Gloves. Any pair of rubber gloves works for me.
- Cleaning cloths. I am in love with the Mabu cloths from Well.ca. They have lasted me a long time and never stink!
- Paper towel. I don’t use it a lot, but I like to use paper towel for cleaning the patio door windows and our cars.
- Scrub brush. I bought mine from the dollar store and it works great for cleaning our stone fireplace.
- Window wiper. This works great for cleaning the windows and patio doors outside. No streaks!
- Dusting mitt. This is a Norwex dusting mitt that my mom gifted me that I love, but I’ve also been known to use a damp cloth to dust.
- Mirror cloth. Also a Norwex cloth, but I simply use water and this cloth to clean all the mirrors. I’m sure you could use any old cloth.
Lastly, here are the ingredients I use, along with some recipes, for DIY cleaning:
- Washing soda. Available in the laundry aisle at grocery stores.
- White vinegar. I buy the club size because I use it for everything.
- Baking soda. Again, I buy a big box because I use it for a ton of stuff.
- Borax. Available in the laundry aisle at grocery stores.
- Liquid castile soap. The Dr. Bronner’s citrus scent is my favourite from Well.ca. Lavender being my second favourite.
- Essential oils. I’ve been enjoying the Aura Cacia products from Well.ca.
- Jar. I use a small jar to create my DIY soft scrub.
- Spray bottles. While any spray bottle from the store will work, my bottles are from PlanetForward.ca, which no longer has an online store.
Homemade Soft Scrub – This is the recipe I like to use to clean soap scum, sinks, and the stove top:
- 3/4 cup baking soda (a bit heaped)
- 1/4 cup liquid Castile soap (I buy it from Well.ca)
- 1 Tbsp water
- 1 Tbsp vinegar
Mix the baking soda, Castile soap and water in a bowl or container. Stir. Add the vinegar last, once the other ingredients are mixed. The mixture will fizz a little. Stir to make a nice soft, paste-like, consistency. (It’s important to add the vinegar last if you want a creamy paste and not sludge.) Make this in small batches as it can dry out when stored. The recipes makes enough for 2-4 uses.
All-Purpose Cleaner – I use this to clean most surfaces. Toilets, bathtub, counters.
- 2 tsp Borax natural detergent – Find this at your local grocery store in the laundry aisle
- 3 Tbsp Dr. Bronner’s Liquid Castile Soap – I’m using ones I picked up from Well.ca.
- 4 Tbsp White Vinegar – a natural disinfectant! I always buy the club size because I like to have it on hand for its many uses.
- Distilled Water (or boiled water)
Mix the borax, white vinegar and a little bit of hot water. (Must be hot water to incorporate the borax.) Add the castile soap, then swirl the bottle to incorporate. Once it’s all mixed, add the rest of the water to fill up to 16oz. It will be slightly white and opaque.
Homemade Oven Cleaner – Works really slick!
Sprinkle some baking soda all over the bottom of the oven. Then pour a bit of vinegar over top. (Not too much.) Let it sit for a couple of hours, or overnight. Finally, after using a bit of elbow grease and a steel scrubby, you should have a pretty clean oven!
Homemade Fabric Refresher
- a small spray bottle from the travel-size section of any store
- 2 Tbsp baking soda
- 1 Tbsp fabric softener
- warm water
- 10 drops of essential oil (I used lavender)
Add the baking soda and the fabric softener to the bottle using a funnel. Add enough warm water to fill the bottle nearly to the top. Water must be warm to dissolve the baking soda. Add essential oil. Close the bottle, shake it up, then get your home smelling good!
Homemade Dryer Sheets – Scent your clothes naturally
- a jar with a lid
- 1 cup white vinegar
- 20 drops of essential oil
- several “rags” (ripped up t-shirts, baby cloths)
Place your rags into your jar. Pour 1 cup of white vinegar and 20 drops of essential oil over top the rags. Put the lid on the jar and shake it up! Each time you put a load of laundry into the dryer, take a rag out of the jar and put it in with the laundry. Dry as you would normally.
Homemade Super Citrus Cleaner – Works really well for cleaning the bath tub!
- Citrus fruit peels
- White vinegar
Place the peels of any citrus fruit into a jar. Once your jar is full, pour white vinegar over top to cover the peels completely. Let it sit for about 5 days before you use it. You could pour it over to a spray bottle, but I just poured it straight from the jar.
Will you be giving any of these recipes a try? Do you have any DIY natural cleaning recipes to share?
Mar 24 | Household Tips
Are you ready to get your Spring Clean on? I am! For the next three weeks, I’m setting aside some time to complete one task a day to be on my way to a cleaner home. I’d love for you to join me!
Task 1
- Clean out your purse/bags. Put all receipts away and organize the little loose items.
As I go along, I’ll be purging items that I see we don’t need or use anymore. I’ll either put them in a donation box or try selling them on a local Facebook Buy & Sell site.
Get your FREE printable checklist
I’ve put together a printable checklist for you to reference over the next three weeks. If you’re interested in getting this free printable, sign up here for the Spring Cleaning email list! Along with the printable, you’ll receive an email each day with that day’s task and my end of the day update. There will also be useful articles for Spring Cleaning thrown in. At the end of the challenge, I’ll also be putting together an ebook that you will be able to get access to if you’re signed up for the Spring Cleaning email list!
Will you be joining me today? If so, leave a comment below!