Join Pinecone and be one of the first to test emerging concepts for a variety of products and services. As a member (membership is free), you’ll be able to complete surveys from the comfort of home at your computer or on the go anywhere from your mobile device.
Here's a bit more information:
Pinecone Research members receive points for each completed survey! Points can be redeemed for gift cards, physical merchandise, and more.
Participation is simple! They send you an email notification when you have a survey available. Complete the survey and earn points to be redeemed for gift cards, physical merchandise, and more.
Are you ready for another round of Splurge vs. Save? Like last time, I’ll feature two similar products but one is the ‘splurge’ version and the other is the ‘save’ version.
If you're into aromatherapy, you'll love this week's feature! As I was googling for this week, I discovered that diffusers can vary greatly in price!
On that note, this week, I'm featuring two ceramic diffusers that look nearly identical but vary in price. Before reading further, can you guess which one is the splurge and which one is the save?
If you guessed that the ‘save’ version is on the left and the ‘splurge’ version is on the right, then you are correct!
4 Ways to save money with online shopping in Canada
It seems as though there's always something to shop for. Upcoming birthdays, new clothes for the kids, work clothes...the list can go on! Whenever I have something to purchase I tend to always look online first.
In most cases I find it easier then hauling a kid around that will most likely put up a fuss at some point during our outing. 😉 I also enjoy reading the reviews that other buyers have left if I'm contemplating a product that I'm not really familiar with.
Now, if you have your list in hand, budget in mind and are ready to begin shopping, here are 4 ways to save money with online shopping in Canada:
A simple tip, but learn to look for coupon codes! If you’re going to purchase something online, start by doing a simple search online for a coupon code that could save you money. To find a coupon code, simply do a Google search for the store you would like to make your purchase at!
Or, my favourite right now is Honey! Honey finds and applies coupon codes at online checkouts for you so you can get back to the more important things in your life quickly. Basically, it's amazing because Honey finds the deals on the things you need without any effort on your part.
Shop through a Cash Back Site
Why not get a percentage of your money back for making an online purchase through a cash back site? Cash back sites work together with online stores to offer you a percentage back as a rebate. Usually somewhere between 3-6%. It’s nice to get some cash back on something you were going to purchase anyway!
I highly recommend Rakuten.ca. Rakuten is an awesome site that pays you Cash Back when you shop online. With over 750 stores, including Well.ca, Indigo.ca, Old Navy, and Sephora, get paid to shop for things you’re already buying.
Bonus, join today and spend $40 within 90 days of your sign up day, and you'll receive a $40 bonus!
Don’t pay for shipping
I really don’t like paying for shipping. Quite often the cost of shipping can be a deal breaker for me. Especially when the shipping costs more than the product I’m buying! For this reason, I like buying from Amazon.ca, Well.ca and Indigo.ca for example, since you only have to spend $30 or $35 to get free regular shipping.
Most of the time, retailers offer free shipping when you spend a certain amount. Occasionally, they offer a coupon code for free shipping. However, I think it’s best if you shop when a store is offering free shipping without a coupon code. This way, you can also use a coupon code to save on the cost of the product, since many stores don’t let you combine coupon codes.
It pays to be patient so you can score free shipping when retailers offer it.
Go in with a friend
You can also save on shipping by chipping in! Ask your sister-in-law, ask a friend, ask a neighbour, or ask a co-worker. If you all shop online regularly, check with each other before placing an order. Splitting the shipping can be an effective cost saving measure, especially when done time and time again!
By combining coupon codes, rebates and free shipping, you should be able to get a great deal on all your online purchases! Do you prefer shopping online or in store? Do you have any other ways to save money with online shopping in Canada?
Are you ready for another round of Splurge vs. Save? Like last time, I’ll feature two similar products but one is the ‘splurge’ version and the other is the ‘save’ version.
This week I'll be featuring a genuine Free People crewneck and an alternative. As we all know, the Free People brand is very trendy right now, but also quite costly! If the genuine brand isn't in your budget right now, I think I've found a pretty darn good alternative!
On that note, this week, I'm featuring two striped crewneck sweaters. Before reading further, can you guess which one is the splurge and which one is the save?
If you guessed that the ‘save’ version is on the right and the ‘splurge’ version is on the left, then you are correct!
Planning a family vacation this year? Meals, snacks and drinks can really add up during those days away from home. While food is one of the most expensive areas of a vacation budget, I have some tips and ideas to help keep those costs down.
Plan ahead
Will you be eating out? Preparing your meals in the hotel? By having an idea of what you intend to do about the meals on your vacation, you have to opportunity to plan ahead by researching restaurants, grocery stores within walking distance, and even compile a meal plan if you're cooking in!
Use those daily deal sites
Sign up for the email list for your vacation destination on daily deal sites like WagJag, Groupon and Living Social. Keep an eye open for deals featuring restaurants you may enjoy eating at. Might as well get a deal if you'll be eating out anyways!
Be a local
By simply asking locals where the best place to grab an affordable meal is, they'll most likely point you in the direction of a fantastic, hole in the wall restaurant that will give you more bang for your buck. Stay away from those tourist traps!
Entertainment coupon books
Sign up for the Entertainment coupon membership! Not only are there tons of coupons for discounted meals, you'll find coupons for local attractions and shopping. 🙂 It's only $34 per year or $4.99 per month.
Search out restaurants where Kids eat free
I have a list available on Simply Frugal where Kids Eat Free in Canada that might be worth checking out. Or visit Family Money School for a huge list of restaurants in the United States!
Stop in at the local tourist bureau
Stop in at the local tourist bureau and peruse the brochures they have available because you might find some great coupons inside! Most likely, the staff on hand will gladly point you in the direction of money saving coupons and even help you find affordable eating options.
Stay at a hotel that offers free breakfast
My husband and I love staying at hotels that offer free breakfast. It's so nice to walk down, grab from the variety they have available, then get on with our day! When we're on vacation, we like to eat a big breakfast so that we can skip lunch, which helps to keep our food budget lower.
Pack a cooler full of food
If you're road tripping, bring along a cooler full of food. Buns, meat, fruit, vegetables and snacks are all great things to have readily available in case you come across the perfect picnic location. Consider freezing some milk to use as an ice pack. You can then use it the next day for cereal!
Hit up the local grocery store
Once you've arrived at your destination, hit up a local grocery store to stock up on snacks, drinks and simple meals. Even if you intend on eating out at restaurants, by incorporating a few grocery store meals, you'll be saving a bundle.
Bring a slow cooker or air fryer
If you can, consider bringing along a slow cooker or air fryer. Put something together in the morning, head out sight seeing for the day, then arrive back at the hotel with dinner already made! Or whip up something quickly in the air fryer!
Meal plan
If your intention is to not eat out at restaurants while you're vacationing, create a meal plan before you leave home that will help take the stress out of deciding what to eat. Keep it simple and allow for some leftovers.
Buy pre-made meals
Once again, if you have access to a kitchen, consider purchasing pre-made meals. While this is more expensive then cooking from scratch, you'll still save quite a bit of money if you take this route.
Now it's your turn, how do you save money on food while you're on vacation?
Are you ready for another round of Splurge vs. Save? Like last time, I’ll feature two similar products but one is the ‘splurge’ version and the other is the ‘save’ version.
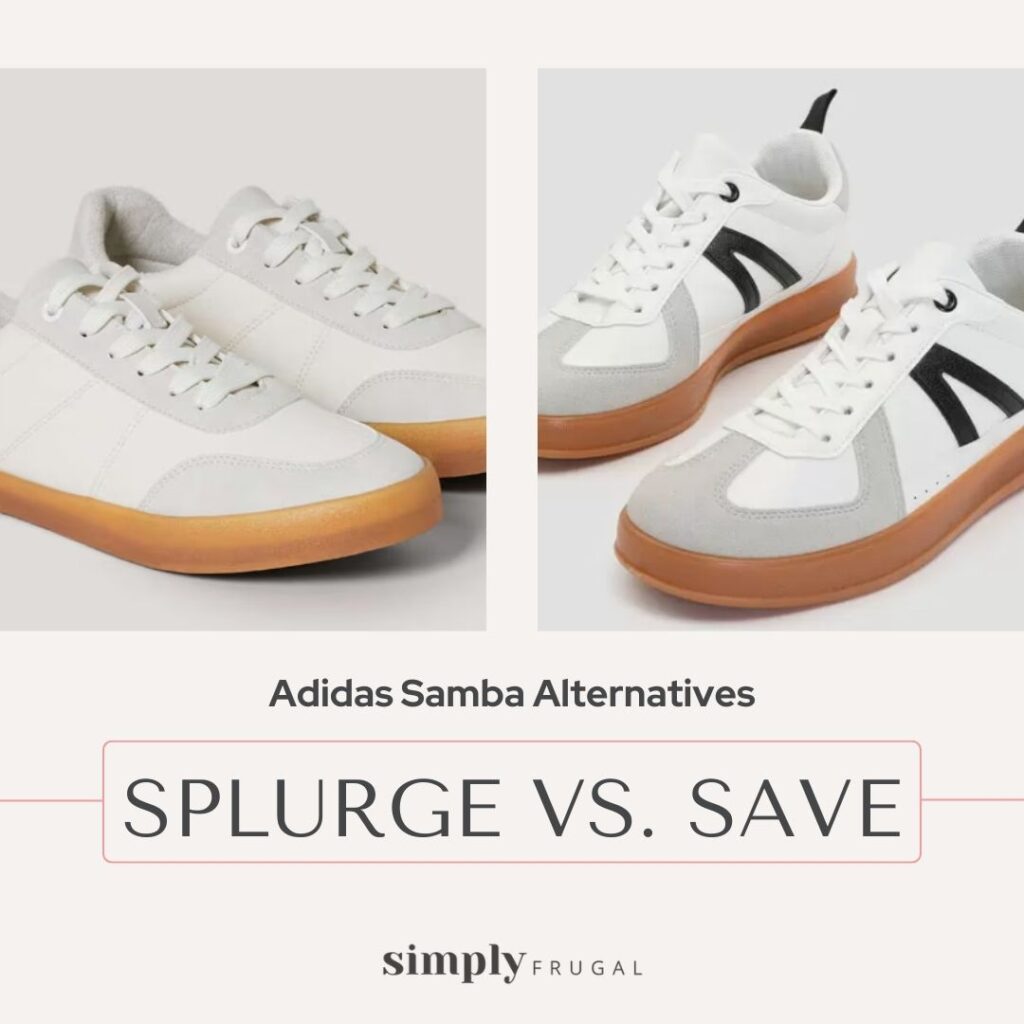
This week is a bit different. In actuality, the splurge version is the Adidas Samba sneaker that is really trendy right now. However, it's often out of stock in most sizes and costs $130.
On that note, this week, I'm featuring two alternatives to the Adidas Samba sneaker. While these are both more affordable, one pair is less than the other. Before reading further, can you guess which one is the splurge and which one is the save?
If you guessed that the ‘save’ version is on the right and the ‘splurge’ version is on the left, then you are correct!
If you are looking for a fun activity to do with the family, The Home Depot has a great workshop for kids that will teach them about building. Kids can learn how to build their very own Butterfly House!
The free workshop is happening Saturday, Saturday, March 9, 2024 - 10:00 AM to 12:00 PM.
It's time to start thinking about Easter baskets and all the goodies you can fill them up with. Nothing is quite as exciting as watching children open their Easter baskets, but, what if you are on a limited budget this year? The good news is you can still fill those Easter baskets with tons of fun without going overboard on your budget.
Look at these 30 fun and frugal Easter basket ideas so you can fill those Easter baskets without breaking the bank! You will find lots of ideas perfect for making your Easter baskets sweet and special.
The ideas here are all things that I will or would love to gift my kids. Over the years as a mom, I have become increasingly annoyed by all the itty bitty "disposable" toys. So with that in mind, I have rounded up what I believe, to be thoughtful "long term" ideas. I hope you enjoy and find perfect frugal Easter basket ideas!
1. Lip balm or lip gloss.
Lip balm is perfect for both boys and girls. Little ones will love their own lip gloss.
2. Sunglasses or sun hats
Now that spring is here, hats or sunglasses will no doubt get some use.
3. Candy, chocolate, gum
You can’t have an Easter basket without some candy and treats, right? I was recently told by my dentist that gum with xylitol is great for fighting cavities.
4. Fruit snacks, nuts, dried fruit
For a healthier option, try fruit snacks, nuts, or even dried fruit for a snack.
5. Playing cards or trading cards
Kids love trading cards and playing cards! This Monopoly Deal card game has been a hot seller!
6. Toothbrush, kid’s toothpaste
A new battery operated toothbrush is more fun than a regular toothbrush. You can always feel good with gifting that! Pair it with kid friendly toothpaste.
7. Water Wow!
These Melissa & Doug Water Wow books are so much fun for younger kids. Great for road trips and a good quiet activity.
8. Hair ties, headbands, hair accessories
Girls will love having a fresh selection of hair accessories. Choose from a wide variety at your local dollar store.
9. Kid’s gardening supplies like seeds, small pots and gloves
With spring’s arrival this will allow kids to get out and get active in the yard and garden. This seed variety pack looks great!
10. Paint with Diamonds
I am all for a creative activity that will keep kids involved for a long time! These Paint by Diamond kits are sure to be a hit! I also really like these Diamond Painting stickers. They're a smaller project to complete.
11. Crazy Aaron's Thinking Putty
These Crazy Aaron's Thinking Putties are a little pricey, but oh so mesmerizing. Your local toy store might be a good place to look for these as well!
12. Kid themed drinking cups
Find kid themed plates, cups, and dishes. Kids enjoy having their own dishes to snack on! These construction themed utensils are so cool!
13. Push Bubble fidget Toy
So fidget toys are a hit with any kid. This one in particular, I think, would be great for counting activities for younger kids.
14. Nail polish, nail files, nail art
This idea is perfect for the little fashionista. These nail stickers are cute!
15. Umbrella
My kids love having their very own fun umbrella for rainy spring days.
16. Pens
I find gel pens, or any type of pen is a hit with my kids! Especially fun coloured ones.
17. Kid Fanny Pack
Fanny packs of our youth are coming back in style! Pick up a kid friendly one for all your spring adventures!
18. Puzzles
Puzzles are perfect for keeping kids busy on a rainy spring day. This LEGO Minifigures puzzle looks fun!
19. Children’s books
Find some fun children’s books perfect for cuddling up with each night. This is a cute one!
20. Coloring books and activity books
Keep kids busy with an assortment of coloring and activity books and crayons. These Paint by Sticker booksare so much fun.
21. Crayons, markers, colored pencils
Let the little artist out of your child with an assortment of crayons and other coloring supplies. Or a different alternative is these Invisible ink pens!
22. Stickers, sticker pads, sticker books
Kids never get tired of stickers. Give them a fun spring selection to get creative with.
A fun classic game of Pick Up Sticksis always a good idea and will last a long time!
25. Playdough, cookie cutters, dough roller
Encourage fine motor skills with an assortment of dough and accessories.
26. Craft kits, mini painting kits, craft supplies
For the budding artist, craft supplies are always fun. I always find little craft kits at the dollar store.
27. Writing Tablet
LCD writing tablets have been a favorite in our house for several years now! Ours actually live in the car and get pulled out and played with every time we go somewhere!
28. Sidewalk chalk
Sidewalk chalk is perfect for staying busy on a spring day!
29. Beach toys, beach buckets, sand castle tools
Summer is just around the corner and kids will no doubt love having beach toys on hand.
A new water bottle will be going in my kids baskets this year. They are in dire need of new ones!
32. Squishmallows
I'm not sure I've ever met a kid that does not love a Squishmallow. They are just so...squishy and soft! I'd link to Amazon, but I find they are cheaper at other stores. I'm sure any stuffed animal would be a hit!
33. Pajamas
Pajamas are always a good idea! I find with the season changes and the growth spurts, my kids are always in need of new pajamas to wear.
34. Swim Suit
Same reason as above, I find that spring is a good time for a bigger swim suit.
As you can see, these Easter Basket options are fun and affordable. Head to your local dollar store or Amazonto see these treats and so many more. These are all frugal Easter basket ideas perfect for filling up your baskets this year!