I know that with every new season, I start feeling tempted to refresh my wardrobe with a few new pieces. You too? There’s something exciting about changing things up a little when the weather shifts. But instead of immediately heading to the mall or filling up an online cart, I’ve been trying to look at the clothes I already own with fresh eyes first.
The truth is, most of us have items tucked away in our closets that still have plenty of life left. Sometimes they just need a little creativity to feel new again! Refashioning old clothes is such a fun and budget-friendly way to update your wardrobe without spending a fortune. Plus, it’s a great way to reduce waste and make the most of the things we already have.
Lately, I’ve been searching for simple ways to refashion clothes, and honestly, there are so many clever ideas out there. From turning oversized shirts into cute fitted tops, trimming jeans into shorts, or transforming dresses into skirts, the possibilities are almost endless. Even small changes like replacing buttons, adding lace, hemming, or dyeing faded fabrics can completely change the look of a piece.
I’ve also been looking for an excuse to pull out my sewing machine again. It’s been sitting untouched for far too long! Some of these beginner-friendly projects seem simple enough that I can work on them during nap time while my daughter sleeps. I love the idea of slowly creating a wardrobe that feels more personal and unique instead of buying the same fast-fashion pieces everyone else has.
What I especially love about refashioning clothes is that it doesn’t have to be perfect. In fact, part of the charm is giving something old a second chance and making it your own. Whether you’re an experienced sewer or someone who’s never threaded a needle before, there are plenty of easy projects that don’t require advanced skills or expensive supplies. Pinterest is a treasure trove of ideas.
If you’ve been wanting to save money, get creative, or simply breathe new life into the clothes you already own, refashioning old clothes is such a rewarding place to start. You might be surprised by how many hidden gems are already hanging in your closet just waiting for a little makeover!
Here are 20 fun and fashionable ways to refashion clothes:
Have you ever tried to refashion clothes before? I’d love to hear which idea is your favourite! I think I might finally try turning one of my husband’s old shirts into a cute new skirt for myself. It sounds like such a fun way to give something old a whole new life!
Do you need a super quick and fun Valentine's Day gift? Try this DIY idea: Candy in a Jar! This is a perfect idea for those of you needing several inexpensive little gifts for teachers, family members, friends or even neighbors.
It's so simple. All you have to do is pour some sort of Valentine coloured candies into a jar, tie a ribbon around the jar then glue the label to the lid.
This Pumpkin Pie Sugar Scrub is a simple and delicious smelling DIY for yourself or a gift idea for the holidays!
My daughter and I had fun over the weekend whipping up some delicious smelling pumpkin pie sugar scrub! It was such a fun and easy activity to do together. Then of course, once we were finished, we had to try it out! Our skin was oh so soft afterwards.
Want to pamper yourself? Here's how you can quickly make a batch of Pumpkin Pie Sugar Scrub. Double up to gift a friend!
Pumpkin Pie Sugar Scrub
SUPPLIES NEEDED:
- 1 cup of white sugar - ¾ cup of coconut oil (cold pressed, virgin coconut oil is excellent) - 1 teaspoon of pumpkin pie spice - 1 teaspoon of brown sugar - glass jar
DIRECTIONS: 1. In a bowl, mix the coconut oil and white sugar. Simply mash it together with a spoon until mixed. 2. Add in the pumpkin pie seasoning and continue to mash. 3. You can now add in the brown sugar. Mix well. If you feel like your scrub is too dry, you can add a small dab of coconut oil to add some moisture. 4. Spoon the pumpkin pie sugar scrub into a glass jar and sprinkle the top with additional brown sugar. This not only adds a little more “scrub” to the scrub but makes it sparkle. 5. Cover with an air tight lid and store in a cool place for up to one week. 6. To use your pumpkin pie sugar scrub, simply apply to wet skin in a circular motion. Rinse with warm water and repeat if necessary.
Have you ever made Sun Tea? It's my favourite way to enjoy iced tea in the summer! The taste of real brewed tea and endless flavour options is what gets me really excited about brewing a batch.
Sun Tea is a method of brewing tea slowly by using the heat of the sun to steep tea bags. I find it fascinating to watch the water in the glass jar slowly change colour as the sun works its magic on the tea bags. 🙂
Sun Tea is really easy to make and is very adaptable to your own personal flavour preferences.
Place in the direct sun for 3 - 5 hours, or until desired strength is reached. Remove tea bags.
Place in the fridge.
To serve: add sliced lemons, fresh mint, sweetener (honey, simple syrup, agave...etc.) if desired.
For the batch I brewed pictured below, I used 2 Ginger Peach tea bags and 6 Orange Pekoe tea bags. I added some of the Simple Syrup I featured the other day until I was happy with the sweetness. I think it tastes pretty darn good, but if I had some lemons on hand I would have added a few slices to make it perfect!
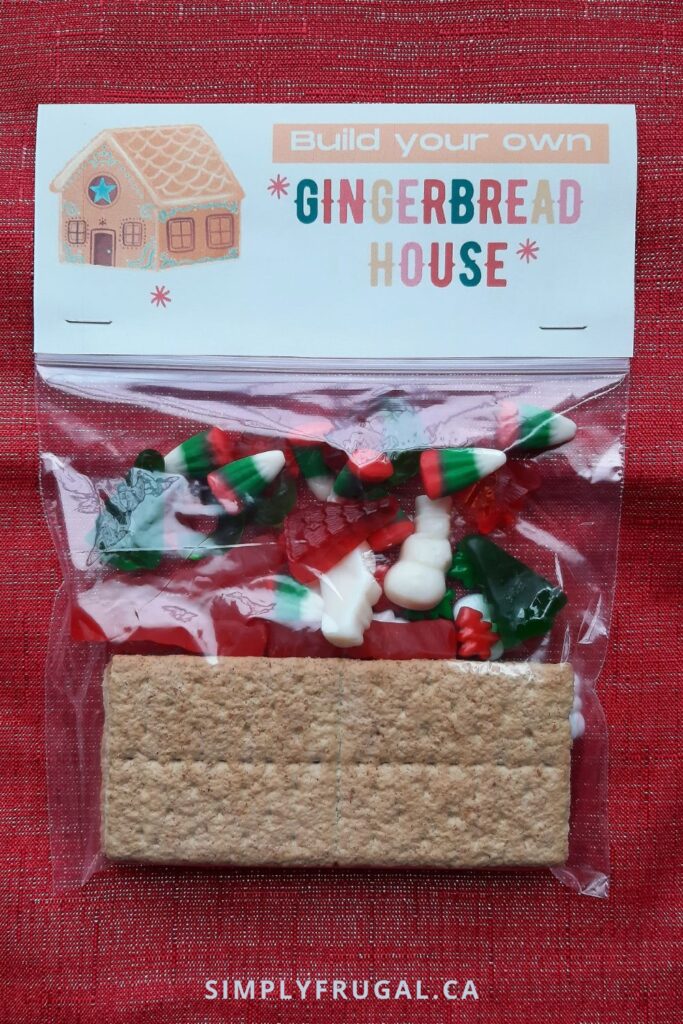
My daughters love decorating gingerbread houses every year before Christmas. Probably, most likely, because they get to consume candy. But I also like to think it's because of the creative process and making something cute.
We like to make a special evening or weekend day out of it by adding hot chocolate and having Christmas carols playing in the background.
This year, I thought it would be fun to create little gingerbread house kits. I even had fun creating a Build Your Own Gingerbread House tag to make them way more official. Lol.
To assemble them, add 8 square graham crackers or 4 of the large rectangle ones if they are the brand name ones by Christie (pictured below). I like the brand name ones best because you can cut the large rectangle on the top half on an angle so it has a point. This is so the roof crackers have a sturdier resting point.
After this, fill the bag with an assortment of candy. I bought all of ours from Bulk Barn. Seal the sandwich bag.
Once you've printed out the tag, cut it out, fold it in half, then staple it to the top of the sandwich bag. Ta da!
The icing I used didn't fit inside the bags, however, you could create a mini piping bag filled with icing that should fit nicely if you're giving it as a gift!
You can make your own icing or you can buy it like I do. The premade icing in a can by Betty Crocker and the likes, also works really well!
I think it would be so fun to have a Gingerbread House making party with a bunch of friends! Young or old!
What are your holiday traditions that you find yourself doing every year?
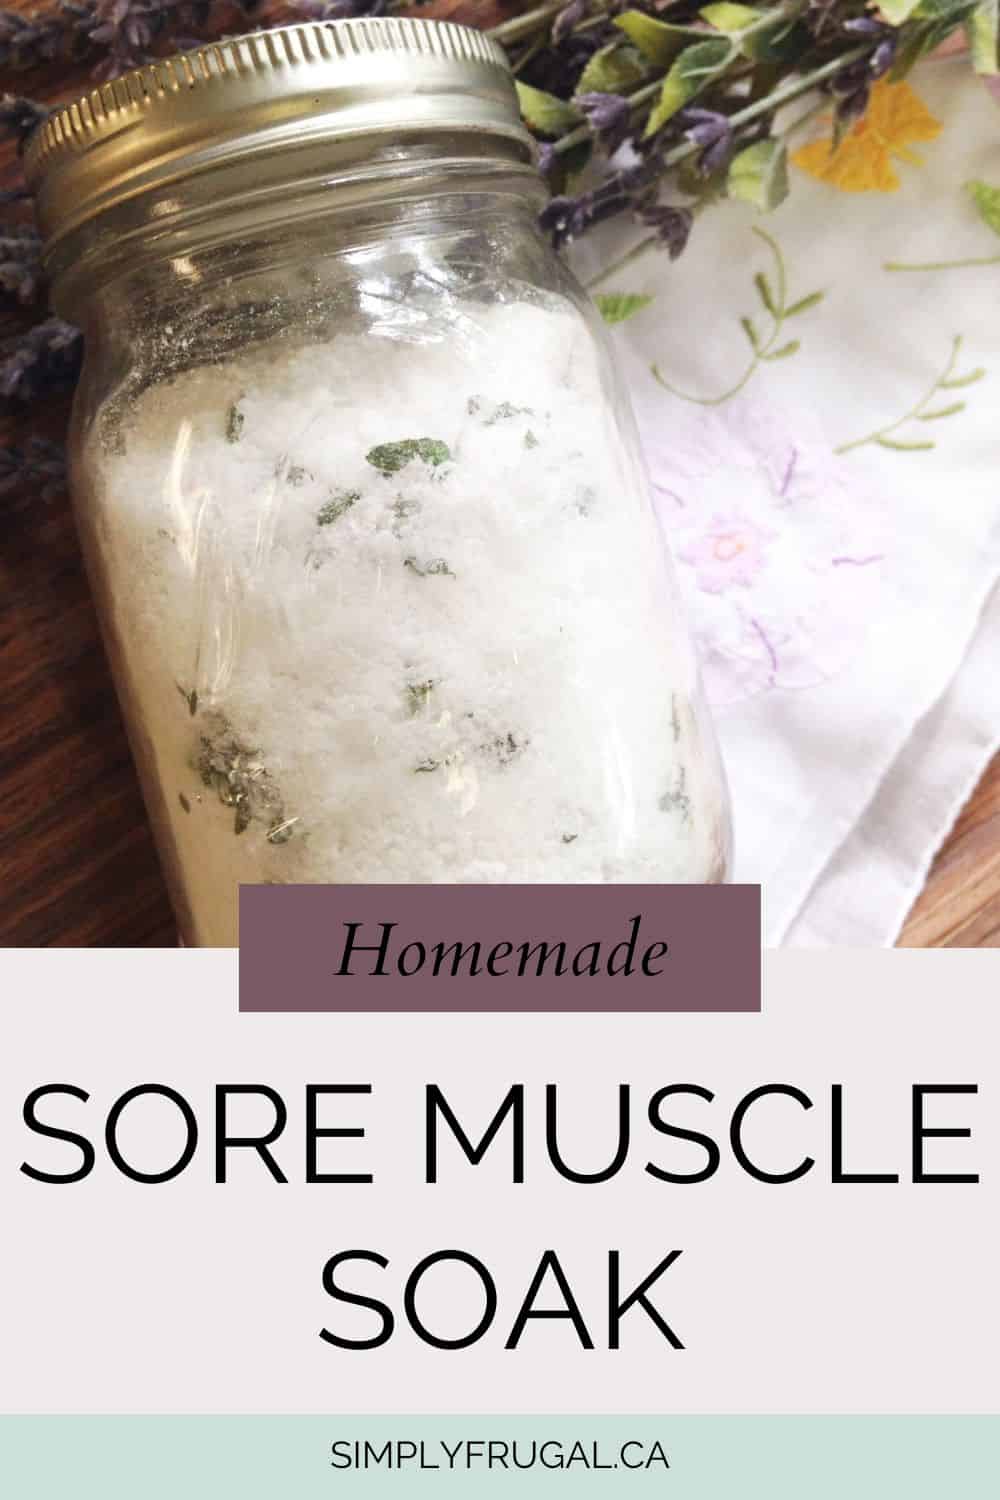
I think this Homemade Sore Muscle Soak would make a perfect gift for someone on your list! Or perhaps it would make a great addition to a spa basket you can make up?
I often find myself with sore muscles in the fall. I think it's because we're out hiking more and working outside more. 🙂 Because of this, I find it really nice to have a warm bath with some of my homemade sore muscle soak! This one smells delicious because it uses fresh mint and lavender (or essential oils). Here's how you can easily make up your own batch of homemade sore muscle soak:
¼ cup of fresh mint leaves, chopped OR 7-10 drops of peppermint oil
¼ cup of fresh lavender, chopped OR 7-10 drops of lavender oil
DIRECTIONS:
Begin by mixing your Epsom salt and baking soda in a bowl. Mix well.
Chop your herbs fine and add them to the mixture. Or, add your oils at this time. For the mixture you see here, I used fresh mint and used lavender oil in place of the fresh lavender.
Continue mixing well. The moisture from the herbs and oils may cause some clumping. This is not a big deal. Just use your spoon to break through the clumps.
Store the mixture in a glass jar with lid or air tight container. I like to let it sit for a few hours before using.
To use your homemade sore muscle soak, just pour it into a running bath. The lavender will help you relax and ease muscle tension, the mint will help revitalize, and the Epsom salt and baking soda will help with inflammation and pain.
When done, drain your tub as usual. You may wish to remove any larger herb clippings by hand to avoid drain issues.