DIY Wine Glass Snow Globes

Create these beautiful and simple DIY wine glass snow globes with just a few supplies that will fit in any Christmas budget!

(Note: The links in this post may be affiliate links. Read the disclosure policy here.)

DIY Wine Glass Snow Globes

You guys, I made a Christmas craft!  I've been spending all my time baking these days so I wasn't sure I'd get this done!  And I even love the way it turned out! 

This is one of those projects that make me wonder why I left it until the last minute. It was so easy. The hardest part was hunting down the fake snow (which I found at Walmart). I'm sure you could find everything you need at the dollar store, too.

Here's what you need to make these Wine Glass Snow Globes:

First of all, you'll want to place a glass upside down onto cardboard and trace a circle around the glass.

snowman progress

Using a hot glue gun, attached your objects to the cardboard. (I used trees and a snowman from Michaels)

Once you're satisfied that your objects are glued down well, fill glass with a few tablespoons of fake snow or glitter.

snow globe progress

Next, line the rim of the glass with hot glue and press on cardboard with the objects attached.

Finally, flip them over, then place them where you want to display them, then put a pillar candle on top!

Create these beautiful and simple DIY wine glass snow globes with just a few supplies that will fit in any Christmas budget!

Hope you enjoy this idea! This is the first time I've created decor for Christmas!

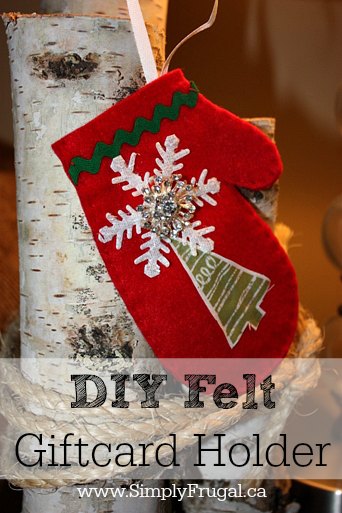
Easy DIY: Cute Felt Giftcard Holder

Create these felt mitten gift card holders to present your gift in a cute way.

Here’s one of my easy gifts I’ve been working on!  I wanted something cute to put gift cards in since I’ll be giving a few gift cards this year.  I came up with the felt mitten idea which can be hung on the Christmas tree as well!  I had most of the supplies on hand already.  Here’s how I did it:

Supplies:

  • Felt piece (dollar store)
  • Fabric snowflake (dollar store)
  • Ric rac
  • Christmas tree cut from a piece of fabric I had
  • Sparkly button (from an old hair elastic)
  • Needle & thread
  • Ribbon (for the mitten to hang on the tree)

Basically, I just drew a mitten shape on a scrap piece of paper that was big enough to fit a gift card, then traced it onto the felt.  Cut it out, then decorated the one side with whatever I could find around the house with fabric glue and thread!  After the one side was decorated, I put the two mitten pieces together by hand stitching them together.  You could use a sewing machine, but I liked the handmade look of the uneven stitches.  That’s pretty much it!  A gift card holder and an ornament in one!

A Homemade Christmas Gift: Holiday Simmering Packages

Warm up your house with the scent of Christmas with these Holiday Simmering Packages!

I thought you guys would like to see what my mom made for a few of her girlfriends for Christmas this year!  They’re Holiday Simmering Packages!  They’ll make any home smell wonderful, just like Christmas!  (They’re not meant for drinking, but for simmering on the stove.) I think I’m even going to make up a few for my girlfriends!

For her recipe, my mom used her dehydrator to dry the oranges, lemons and apples, but you could also dry them in your oven or just use fresh peels!

Holiday Simmering Packages
Ingredients
  • 3 Cinnamon Sticks
  • 1-2 dry orange slices
  • 1-2 dry lemon slices
  • 1-2 dry apple slices
  • 2 tsp. whole cloves
  • 1/4 tsp. ground cloves
  • 2 tsp. whole spice
  • 1/2 tsp. ground nutmeg
  • 1-2 crushed bay leaves
  • 2 tsp. dried mandarin orange peel
Instructions
  1. Place all the ingredients in a plastic bag.
  2. Put a label on the bag with these instructions:
  3. Place ingredients in a pot of water and simmer, adding more water as needed! Makes your house smell wonderful!


Easy DIY Candy Cane Reindeer

I have got the cutest holiday project for you today! It’s so simple too! I think they’d make a good project to do with kids. Maybe as a craft at a holiday party?  Or maybe wrap them up to add a cute touch to a hot chocolate gift? Regardless of what you do with them, they’re awesome because they involve chocolate and peppermint! 🙂

Here’s how to make simple Candy Cane Reindeer:

INGREDIENTS:

DIRECTIONS:

  1. Line a cutting board or cookie sheet with wax paper.
  2. Heat chocolate candy chips by microwaving for 30 seconds stirring and repeating until melted.
  3. Take 2 candy canes and dip the bottoms (straight parts) in chocolate and shake off excess.
  4. Place together on wax paper so hooks of each go off in opposite directions.
  5. Place an unwrapped Hershey Kiss on the chocolate covered canes.
  6. Repeat for remaining canes.
  7. Using a toothpick, take a dab or melted chocolate and glue the red candy on top of the kiss as the nose.
  8. Using a toothpick, take a dab or melted chocolate and glue on the eyes.
  9. Take the white chocolate chip and place on wax paper and heat in microwave for 15 seconds.
  10. Take another toothpick and paint a white mouth on each reindeer.

Aren’t they cute? Are you going to give these Candy Cane Reindeer a try?

Related holiday recipes:

This is the cutest holiday DIY that I ever did see! These candy cane reindeer are so simple to create too! Perfect addition to hot chocolate.