A Homemade Christmas Gift: Pillow Mattress
Kicking off the Homemade Christmas Gift series is something that will surely be a hit with the kids!
Learn how to make a Pillow Mattress over at It’s Always Autumn! Great for sleepovers, lounging and more!
Kicking off the Homemade Christmas Gift series is something that will surely be a hit with the kids!
Learn how to make a Pillow Mattress over at It’s Always Autumn! Great for sleepovers, lounging and more!
It is that time of year again, when ghouls and goblins will be showing up at your door asking for tricks or treats. If you have a great number of visitors in your neighborhood, you might be wondering how to save a little cash on Halloween candy. Well don’t fret, take a look at these 7 simple ways to save money on Halloween candy and get the sweets you need for less.

You will be quite impressed when you see the selection your local dollar store has to offer. Everything from fun sized licorice to candy bars are available as are themed pencils and erasers perfect for passing out.
As mentioned above, your local dollar store will have themed treats like pencils, erasers, and other small Halloween toys. These are great for passing out to trick or treaters and can cost less than a bag of candy. For example pencils can be sold in packs of 18 for $1, while most bags of candy have less than 18 treats. Do the math and see if it makes sense to opt for a non edible treat.
Your hard candy like suckers, mints, gumballs, etc. will always cost less than chocolate bars. When you buy hard or other non-chocolate candies you are sure to save and are able to get more bang for your buck.
This is a wonderful tip, because buying your favorite candy means you will eat it. (guilty!) When you eat it, you need to buy more. Instead, choose a candy that isn’t your favorite and you don’t have to worry about half of it being gone before Halloween even gets here. Along the same lines, don't buy too early because it may end up being eaten before Halloween. 🙂
Since Halloween candy is seasonal, it's a specialty item and will cost more at your local grocery store. Instead, opt to buy it at a retail store like Walmart, Dollar Tree, or Dollarama. You will get better prices and still have an excellent selection.
Stores will start offering all sorts of deals on their Halloween candy and treats. Don’t take the first deal you see. Instead compare flyers and price match. This is a great way to get a great price without having to run all over town.
Don’t go broke trying to buy Halloween candy this year. Instead, give these tips for saving money on candy a try and you can still fill those treat bags for less.

(Note: The links in this post may be affiliate links. Read the disclosure policy here.)
You guys, I made a Christmas craft! I've been spending all my time baking these days so I wasn't sure I'd get this done! And I even love the way it turned out!
This is one of those projects that make me wonder why I left it until the last minute. It was so easy. The hardest part was hunting down the fake snow (which I found at Walmart). I'm sure you could find everything you need at the dollar store, too.
First of all, you'll want to place a glass upside down onto cardboard and trace a circle around the glass.

Using a hot glue gun, attached your objects to the cardboard. (I used trees and a snowman from Michaels)
Once you're satisfied that your objects are glued down well, fill glass with a few tablespoons of fake snow or glitter.

Next, line the rim of the glass with hot glue and press on cardboard with the objects attached.
Finally, flip them over, then place them where you want to display them, then put a pillar candle on top!
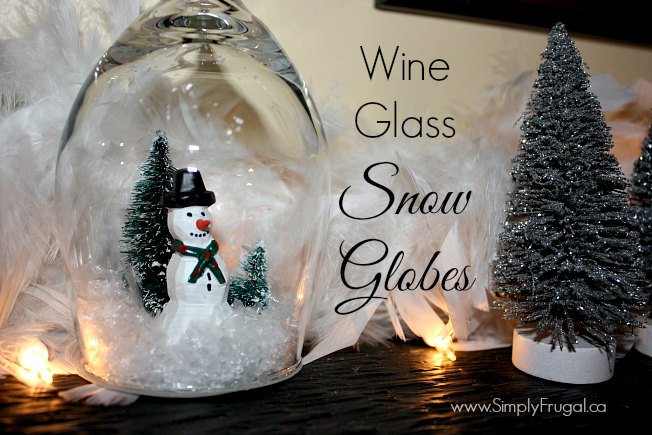
Hope you enjoy this idea! This is the first time I've created decor for Christmas!

We love peanut butter cookies in this house. Any time of the year actually! Since it’s Christmas time and all, I thought I’d jazz up some ordinary cookies and turn them into Rudolph cookies! Cute right? They taste especially delicious too. In fact, I think Santa would love to find some of these Rudolph peanut butter cookies on his travels! Be sure to leave a plate full 🙂


I hope you enjoy these cookies as much as we do!
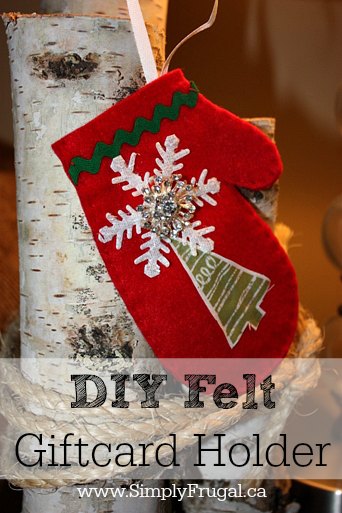
Here’s one of my easy gifts I’ve been working on! I wanted something cute to put gift cards in since I’ll be giving a few gift cards this year. I came up with the felt mitten idea which can be hung on the Christmas tree as well! I had most of the supplies on hand already. Here’s how I did it:
Supplies:
Basically, I just drew a mitten shape on a scrap piece of paper that was big enough to fit a gift card, then traced it onto the felt. Cut it out, then decorated the one side with whatever I could find around the house with fabric glue and thread! After the one side was decorated, I put the two mitten pieces together by hand stitching them together. You could use a sewing machine, but I liked the handmade look of the uneven stitches. That’s pretty much it! A gift card holder and an ornament in one!
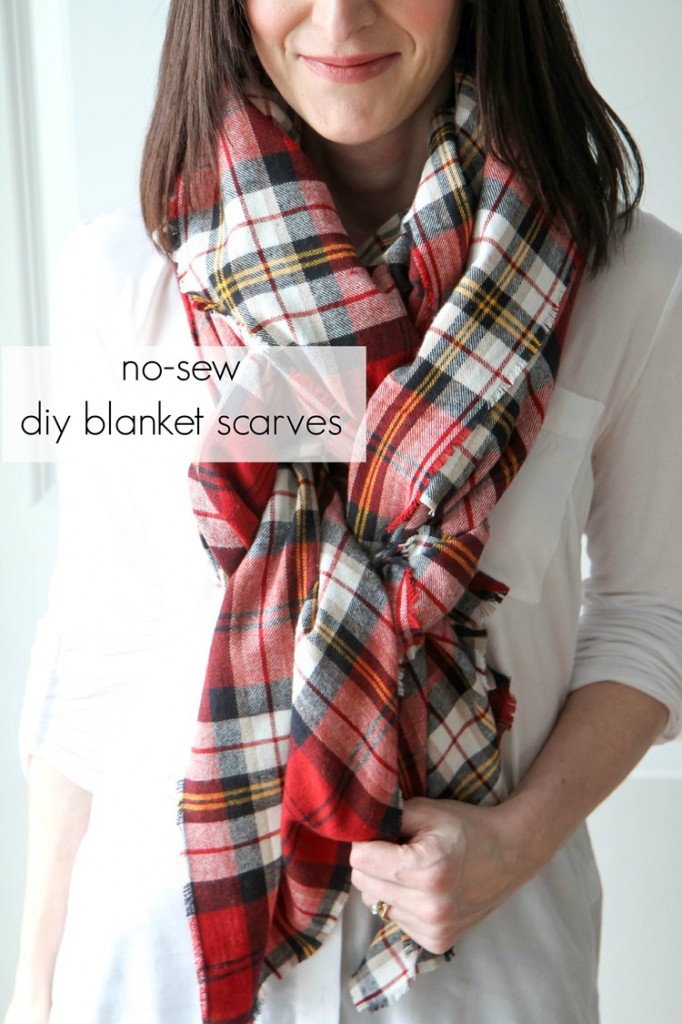
These scarves are so cozy looking! Learn how to create a No Sew DIY Blanket Scarf that someone on your gift list is sure to love!
