January. The month where I feel the overwhelming need to declutter and get organized. Of course, with Christmas just passing, that surely doesn’t help the feeling. Especially since we’ve just received new stuff and spent December flying around visiting, shopping, baking and just generally not tidying up after ourselves! (or is that just me?)
In an attempt to feel better about the place I call home, enter, the Simply Clutter Free Challenge! It’s a reset for your home!
Throughout the month of January, I’ll be posting some tasks, tips and free printables relating to organization that will help you to enjoy a cleaner home by the end of the month! Woo hoo! I’m really excited because I’m still trying to figure out how best to organize things around here!
Ridding my home of excess makes me appreciate my home and the objects I choose to live with more. Never mind the fact that I usually don’t want to add any new things because I can breathe with the new found space. (As well as spend less time cleaning and wasting money!)
This year, I’ve decided to do a daily task (Monday – Friday). I’m going to be jumping all over the place since I tend to get frustrated when I work in the same room for too long. I find it really daunting to work on a whole room and end up quitting before I get started. So I find if I break each room of my home into little projects, I see improvement almost instantly, which keeps me going!
Let’s get on with the tasks shall we? 🙂 (You may have to adjust the tasks to suit your own needs.)
But first of all, are you in? Will you be joining me to get organized in January? The big Simply Clutter Free Challenge starts on Wednesday, January 1, 2020. Along with each task, I’ll try to have helpful tips and printables!
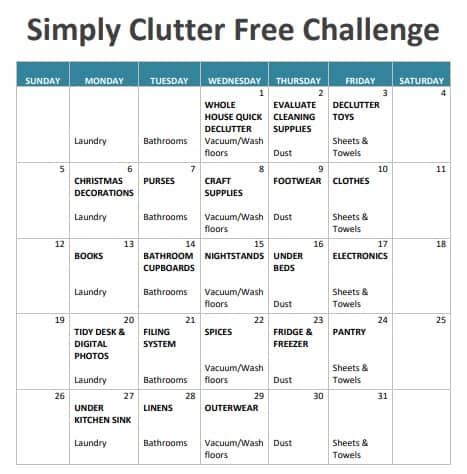
January 1: Whole house quick declutter (clear surfaces and declutter, 3 boxes or bags out of the house)
January 2: Evaluate cleaning supplies (replenish supplies if necessary)
January 28: Tidy/Declutter Linens (Sheets, Towels)
January 29: Organize Outerwear
This year, I’ve also created a calendar for the month of January listing the daily organizing tasks. Since I’ve been finding I also need more of a cleaning routine to keep the house less disastrous, I’ve added daily cleaning tasks too. (Like laundry, bathrooms, vacuuming…etc.) Hopefully you’ll find the calendar useful! You can download and print it by clicking here.
I’ll will be posting random progress reports throughout the week over in the Simply Frugal Facebook group and Instagram! Follow me on Instagram @simplyfrugal and use the hashtag #simplyclutterfree to get updates and see what others are up to during the challenge!
Also, I have set up an email list that you can join if you would like me to send you the daily tasks each day to your email address! This is also the email list to be on if you are interested in any of the future challenges I have planned for 2020! You can sign up for the Simply Clutter Free Challenge emails, here!
This year, I’m on a mission. Not only to have my own organized Christmas season, but I’m hoping I can help you as well!
Introducing… 8 Weeks to a More Organized Christmas!
Behind the scenes, I’m working on getting the Simply Frugal Holiday Gift Guides up and running, which I hope will help make your shopping easier and more frugal. But, I’m also hoping this series, 8 Weeks to a More Organized Christmas, will help you be more organized and spend less this Christmas season.
My goal with the series is to help guide you in making your Christmas season more manageable by providing you with a weekly task to help you get everything in order. I also find, the more organized I am, the less money I spend because I’m being more intentional!
There will be a ton of printables, checklists, articles full of tips and inspiring ideas to help you.
Since it’s called 8 Weeks to a More Organized Christmas, we’ll be getting started on Friday, October 30, because Christmas is then only 8 weeks away! I’ll have the first post up with your first task. Every following Friday, there will be a new post with a new task for you to focus on.
How does that sound? Are you in? Do you want a more organized Christmas? What do you struggle with the most each Christmas season?
Sign up for the 8 Weeks to a More Organized Christmas newsletter to receive a FREE Christmas Dinner Checklist! This checklist is quite detailed and will help you remember all the details needed for a memory filled dinner with family and friends. You’ll also receive a weekly email with each week’s “task”.
Do you wish you had more hours in the day? Does your energy level not match the number of tasks you have to complete? If you are feeling like you need a break, you may just need to be working smarter, not harder. Take a look below at 7 simple tweaks for an easier day so you can start feeling less stressed and more effective. Here is how you can get started:
7 Simple Tweaks for a More Productive Day
1. Make your to-do list the night before.
Before you go to sleep, make a to do list of all the items you need to do the next day in a dedicated notebookor planner. Not only will this help you feel more relaxed at bedtime, but it will give you a solid and focused foundation to work on as soon as you wake up. The end result is feeling more accomplished at the conclusion of the day.
2. Utilize helpful apps.
There are thousands of apps out there that can help make your day easier. You can find everything from time saving apps, to digital calendars, reminders, to even apps that send you daily inspiration. Our family is really enjoying the Cozi app. It keeps all our schedules organized in one shared calendar. It’s free too! Try experimenting with some new apps and see if you can find any that are helpful to you.
3. Let the light in.
As soon as you wake, start bringing natural light in. Open your curtains or take a quick walk outside. It will help wake your body and let your brain know it is time to get to work. This is a simple step that can help get your day off to a strong start and help you be more productive.
4. Keep tasks in the car.
Keep a basket of quick tasks in the car that you can work on when waiting in the car pool line or for your child to get out of practice. Tasks can include a daily journal, items you need to read, paperwork that needs to be filled out, your daily calendar to update, etc. This can help you make the most of those spare minutes.
5. Carry a water bottle.
Not only can staying hydrated keep you more productive, but it can save you time from having to stop and look for drinks. If possible use a measured water bottle so you can keep track and make sure you consume enough water each day.
6. Set realistic goals.
Don’t be too hard on yourself. Set realistic goals that you can achieve over the course of a day. This way you will feel success at the end of the day when your list is able to be checked off. Try making a list of 5-7 goals for the day and then gradually work your way up as you get into a groove.
7. Don’t leave loose ends.
Many times we move onto another task before finishing the one at hand. Get into the habit of not leaving loose ends. That can just lead to you feeling frazzled and overwhelmed. Instead, finish one project or task before moving onto a second so you can feel a sense of completion and accomplishment.
What are your techniques for making your day run smoother?
Organizing your home looks so fun and easy on TV. There are so many helpful organization tools they use. They get you all excited about becoming organized and so you head out to grab those tools and get started.
Then, full stop, you see that purchasing all those “great organization tools” can be really expensive. So, you can either revamp your plans by buying one or two and do less than you had planned, or you can just blow the whole thing off and feel defeated.
But, the good news is that there are plenty of storage and home organization solutions you can find at your local dollar store for a fraction of the cost of those advertised in those shows. So, if you’re living in a disorganized space and want to get organized, this is for you.
These home organization tips from the dollar store are sure to get you excited:
Small Jars
It can get really frustrating when you’re cooking and you can’t find the exact spice that you need, right? One way to solve this problem is to use small jars from the dollar store.
You’re actually knocking out two birds with one stone: neatness and uniformity. You can achieve this by putting all your spices in the same type of container and label them. They will look very neat and orderly once you’ve done it.
Storage Bins
The kitchen pantry can be quite tricky to organize but storage bins from the dollar store can go a long way in helping organize this space.
For example, you can put all your candles in one bin and label it. Same goes with your napkins, utensils, cups, and plates for parties or picnics.
Investing in transparent bins can be really helpful because you can instantly see what’s stored inside. But for a less cluttered look, opaque bins that are labeled might be the way to go.
Label Items In Your Fridge
Labels are actually one of the best organization tools. Because let’s face it, we’ve all found a science experiment growing in a container in the back of the fridge that could have been avoided with this tip.
All you have to do is write the date the food was put in the fridge. This is really helpful because when you’re searching through the fridge for anything you can see the dates and know when to throw things out.
An added plus is the kids don’t have to dig through the fridge for half an hour looking for something to eat, because it’s all labeled and they can see What they have to choose from.
To do this, simply use some masking tape or sticky labels that you have purchased from the dollar store.
Hooks
You can find the most clutter in many homes in the garage. That’s why it’s important to have your garage organized. One way to do that is by using hooks in your garage.
Most all of the items in your garage can all be hung by a hook on the wall or ceiling. Just be sure to buy hooks of different sizes. Doing this will leave plenty of space for your car and you’ll never have to worry about running over anything. Yay!
Drawer Compartments
Drawers can also be really messy because they usually serve as a graveyard for small items. This can make it a pain to find anything in your drawers when you’re in a hurry.
In order to fix that, all you need are those plastic drawer containers to organize all the items. They come in a great variety of sizes too.
Hanging Shoe Racks
Purchasing these hanging shoe racks at the dollar store is another great tool for organizing. They can hang on the inside of any door to save space and help organize your stuff.
Use them in the pantry to organize spices, foil, wax paper, baggies, and so much more.
Use them in the bathroom to add extras for when something runs out. You can add soaps, razors, toothbrushes, toothpaste, etc. anything you might need to replace.
Use them in your closet to stash necklaces and bracelets, undergarments, socks, and of course, shoes. These hanging compartments can come in handy almost anywhere in your home.
Organizing your home doesn’t have to be expensive, it can be fun and you’ll feel less crowded and quite accomplished when you’re done. Plus, all of these can be purchased at the dollar store for next to nothing, saving you money – always a good thing!
Do you have other brilliant home organization tips using items from the dollar store? Please tell us in the comments below, we’d love to hear about it.
One of the ways I began to save extra money was by ditching some of the disposable products we used in our home and replacing them with reusable household items.
In the beginning, this did cost us a few more dollars but quickly turned into big savings each month we weren’t purchasing the disposable versions!
Now, I know the appeal of disposable items. They can be so gosh darn convenient! But by simply switching out one disposable product for a reusable product, not only will it have a positive impact on our planet, it will also have a positive impact on your wallet! Before you know it, you’ll be trying to replace every household product with a reusable one!
Below, I’ve listed the best reusable household items that we’ve been loving in our own home lately!
Wool Dryer Balls
For years now I have been using wool dryer balls in place of dryer sheets and fabric softener. In fact it’s been a while since I bought my wool dryer balls so they’re finally starting to fall apart!
If I ever feel like having a bit of a scent to the laundry, I’ll add a couple drops of essential oil to a couple of the balls.
When purchasing wool dryer balls, make sure they are 100% wool. This will ensure fluffiness, reduce static and reduce drying time.
Reusable Water bottles
Before we leave the house, I make sure all of our reusable water bottles are filled up so we can avoid buying a bottle of water when we’re out and about.
While any reusable water bottle will work, our favorites are the ones that are insulated. They keep water cold for much longer! My husband and I are using bottles like these while I like the Thermos ones for our daughters.
Kitchen towels
Ditch the paper towels once and for all! I have one roll of paper towel on hand and that is to check the oil in our vehicles and for wiping up cooking grease. Other than that I use kitchen towels, cloths, and big bath towels for cleaning up spills, and wiping dirty fingers and faces. Basically reusable towels are used for everything paper towels are typically used for.
It’s so easy to make the switch to reusable straws! We’ve got two different kinds that we use at home. Stainless steel and super fun silicone ones. I don’t have a preference for myself, but my daughters like the silicone ones the best. Probably because they’re soft (safer for kids!) and fun colored.
Be sure to get a small straw brush to keep your straws clean!
Reusable K-Cup
We were gifted a Keurig coffee maker years ago and it’s still one of our favorite appliances and gets daily use. The one thing I don’t like about it is the k-cup waste. However, we recently switched to a reusable K-Cup and love it! It’s so easy to use and the coffee tastes just as good. Plus now we can get a big bag of ground coffee beans (cost effective) or use the locally roasted beans that we love.
Reusable shopping bags
Now that most grocery stores are charging for plastic grocery bags, I want to avoid that unnecessary expense as much as I can! I have reusable grocery bags stashed in the car and both of my bags in hopes that I won’t have to use a plastic bag.
The reusable shopping bags that I have are similar to these ones and fold up really small and are so easy to stash in my purse. I love that they are washing machine friendly so I can toss them in the wash once in while!
Silicone baking mats
With silicone baking mats, there’s no need to spray your cooking sheets or use parchment paper. That means you could possibly eliminate two grocery items from your list saving you a bundle in the long term.
Silicone baking mats are really easy to clean and hardly take up any space in your cupboards.
Mason jars
Open up the cupboards or even your fridge and you’re bound to find some sort of glass jar! Wash and reuse the glass jars that you find for so many things. I use mine for storing dried beans/lentils/rice, freezing broth, holding makeup brushes and so much more.
Mason jars are fairly inexpensive to buy if you want matching jars. Scour the garage sales too!
Reusable Sandwich Bags
This is a new purchase for us and I’m loving it! I used to wash our plastic sandwich a few times before tossing them, but I’m liking this alternative way better.
These reusable storage bags are freezer friendly, leak-proof, come in various sizes and clean easily.
Travel Mugs
These are a must-have in our family! Every morning, instead of hitting the drive thru, my husband makes a travel mug full of coffee for his morning at work. Saves a ton of coffee money over the long run! I’ll bring mine along when I’ve got a bunch of errands to do. But even if you do go to a coffee shop or something, many places offer a small discount if you bring your own mug. (Starbucks, for example.)
Using these reusable household items is such a great way to begin moving towards a more eco-conscious way of living plus you’ll be saving a lot of money over the long term!
I’d love to know what reusable household items you would add to the list!
Our family is about to head out on, what we hope will be an epic road trip, to Winnipeg. We are all so excited to see family, play with cousins, see new sights and make memories!
But, I’m not going to lie and say that I’m not anxious at all. Haha no. This will be our very first major trip since our youngest daughter was born. That was more than three years ago! She was a terrible sleeper for the first 3 years of her life so the thought of sleeping anywhere but home would practically make me sweat.
But here we are, just days away from our road trip and I have been in planner mode all week trying to calm my nerves. I have multiple lists going on for car activities, packing essentials and, my favourite, snacks. No road trip is complete without snacks!
Thanks to , our snacking has been taken care of. I popped in the other day and grabbed our must-haves as well as some fun new things to try. Because the in-season produce selection at FreshCo is amazing, we will have a great selection of fresh fruit added to our dry goods. Not only is the quality of products noteworthy, the prices are the best in town – you can’t beat that!
And guess what? There are two new FreshCo stores in Winnipeg that opened this spring! I’ll be making a pit stop to restock on food for the car ride back.
Since I always like to see what other families bring along on road trips, I thought you would like that as well. So today I’m excited to share a list of our snacks! I also have a fun way that I have packed some snacks for the girls that I think you might enjoy or find helpful too.
First of all, here’s a list of the fresh produce we will bring along this time:
Watermelon (cut up into sticks)
Grapes
Blueberries
Sugar Snap Peas
Carrot sticks
Apples
This will all be kept in a cooler that we will bring out when we make stops to stretch and get gas.
Now for the fun surprise for the girls. I picked up a couple of divided organizers from the dollar store that I filled with a variety of healthy and not so healthy snacks (but always a crowd favourite!) from FreshCo. I think they are going to love the smorgasbord of choices. The organizers aren’t that big so when they finish the tray, I’ll refill them during one of our stops.
Here is a list of what’s in the divided organizers:
Nuts would also be a great choice, but we’re trying to avoid them with my youngest. However, I think that list above will be plenty to get us there! We’ll stock up again on our way home.
Now I’m wondering. What sort of snacks do you like to bring along on road trips?
Next week, I’m going to have a list of all the car activities I have planned so be sure to watch for that post! #Sponsored