I thought this would be a fun new feature to introduce to Simply Frugal! The idea is that each time, I’ll feature two similar products, but one is the ‘splurge’ version and the other is the ‘save’ version.
First up, is the popular Lululemon Scuba hoodie and an alternative from Amazon.ca. Before reading further, can you guess which is which?
If you guessed that the ‘save’ version is on the left and the ‘splurge’ version is on the right, then you are correct!
Here are the links to shop them both if you are interested:
You know planning a menu is a good thing, but sometimes it only feels like another chore to cross off the to-do list. Well, end that once and for all by creating a rotating menu plan!Put your menu plan on autopilot!
How to put menu planning on autopilot:
I have not been feeling the love for menu planning for quite some time now. That makes me sad because without a menu plan, our meal time is definitely not what it should be. I’ve been resorting to quick prep meals (think frozen pizza, pasta with a jar of sauce poured over top and grilled cheese & tomato soup…) Not good! Between picky palates and no desire to cook, menu planning took a real nosedive in the last year or so. On the other hand, the grocery stores were probably quite happy, because I was spending more since I had no plan. 🙂
That brings me to today. I’m pleased to say, I’ve found a system that works for me! Actually, I’ve put menu planning on autopilot! It initially took a little bit of work upfront (still only 4 steps!), but now we’re smooth sailing and enjoying meals we love.
Step 1: Brainstorm
This part took me the longest. I sat down one afternoon and wrote down all the meals we like to eat. Our family favourites. My goal was 60 meals, but I quickly realized that was a lofty goal. In the end, I came up with 40 meals. Enough for 8 weeks of eating when I allot 5 meals a week. I like to leave 2 days free for last minute events, trying out a new recipe and Sunday dinner at my parent’s house.
Here are the meals that made the rotation. Keep in mind that they must be simple, enjoyed by all family members and not require any weird ingredients:
Most of these meals can be made with pantry staples, which are easy to stock up on when they’re on sale.
Step 2: Write all recipes on index cards
Now, once I picked all 40 meals, I wrote each meal down on an index card. Sometimes I wrote the entire recipe (if it was not found online or in a cookbook). Other times I wrote the name of the meal and where the recipe could be found (Pinterest, page 3 in a cookbook…etc.) I also wrote down side suggestions and any adjustments I like to make to the recipe.
Step 3: Place them all in a recipe box/binder
Next, I placed all of the index cards in an empty recipe box that I had, in no particular order. You could place the index cards in a binder with protective sheets instead, but I liked the idea of a recipe box.
Step 4: Pull out a week’s worth of meals and place in front
Here’s where the autopilot comes into play. Since I’m only choosing 5 meals a week, I pulled out 5 random index cards and placed them in the front of the box. I put a divider card behind the five recipes so I know when I’m done for the week. Once all 5 meals are made, I rotate those index cards to the very back of the recipe box.
Step 5: Repeat Step 4 over and over!
On Sunday, when I pull out the 5 meals for the week, I also create my grocery list. I write down everything I don’t already have in the pantry/fridge/freezer.
Now, you could take this a step further and look at your store flyers first to determine which index cards you should pull out for the week according to what’s on sale. For example, I may not want to make the Balsamic Beef Roast this week because I don’t have one in the freezer and I don’t see a sale at any of my local stores. However, pork chops are on sale so I’ll make the slow cooker BBQ Sauce pork chops instead.
Does that all make sense? This system has been life changing for me! I hope it might work for you as well if you’ve been struggling with menu planning.
Have you found a menu planning system that works for you?
Organizing all the closets in your home can seem daunting, but I’m here to tell you that it is possible to whip them into shape in one weekend. Dedicate one weekend to closet organization and you will be so pleased with yourself come Monday morning! There’s also no need to order fancy and expensive closet organization systems. It’s totally doable to organize closets on a budget, in a weekend! While you may need to enlist a friend to be the objective voice of reason (as to whether to keep or toss something), it can be done!
Start with the clothes closets.
In each clothes closet (bedrooms, entry coat closet etc.), you’ll need to go through the contents and sort each into like piles (clothes, shoes, accessories, etc.). You’ll also want to make a few other piles for items to donate, return to original owner, or toss. Deciding what gets the axe can be hard, and is the most time-consuming part of the whole process. If you just can’t do it, this post I wrote might really help you out!
Next, you’ll want to hang everything by category (tops, bottoms, dresses, etc.). Keep in mind that if you hang everything on the same style of hanger, the clothes will line up evenly, which matters aesthetically, but also keeps clothes wrinkle-free.
Keep all of your shoes in one place, whether that’s a hanging organizeror a shoe rack. Some people use a cubby system, while others use clear plastic boxes. Whatever floats your boat!
Be sure to save room for accessories, hats, gloves, scarves and even jewelry. Use containers to keep them wrangled in one place, or hang hooks on the wall, if room allows. Your perfect solution to organize closets on a budget might be found at the dollar store!
Move onto the bathroom linen closet.
This is a closet that I highly recommend you take the time to sort, toss and donate from. It’s typically a tight space, so why waste precious real estate on expired medicines and cosmetics, or threadbare linens?
Once you have the items you are going to keep, designate a first aid container and label it so that anyone visiting your home can access these items if needed.
Keep cosmetics together and group them into containers based on what they are (This includes bath, body, and hair products.) Purchase an over cabinet door hair dryer & styling tools organizer to keep your tools off the counter.
Fold all of your linens as similarly as possible and as compactly as possible. I like to roll our towels.
Next, tackle the kids’ closets.
You’ll handle these the way you handled the other clothes closets with a few additions.
Stack any games or puzzles that live in the closet by size and put any other toys that would normally end up in there inside of containers on the top shelf.
Depending on the size of the closet, you can put a large, plastic tote on the bottom for outgrown items that you plan to hand down to another child, or you could set up a cubby shelf for toy, book, shoe or accessory storage.
Finally, organize that pantry!
Sort the items into categories and set aside foods you intend to donate. Check the dates on everything. You have to make sure all food, including spices, are still good. To really get on top of your pantry organization game, use matching containers (either labeled or clear) to house cereal, pasta, rice, flour, sugar, coffee and other items of this nature. If you have workout supplements, baby items or pet supplies, be sure to separate them into different spaces.
Now exhale! While your house may still have clutter to handle, you can focus on those areas another weekend. It’s totally possible to organize closets on a budget in a weekend! The main take aways are: declutter first, then group like items together. There may not even be a need to purchase any supplies to organize! You’ve got this!
We go through quite a few tortillas in our home. Between quesadillas, burritos, tacos, cream cheese & meat rollups and even pizzas, it feels like I’m always buying a pack of tortilla shells. That can really add up when a package costs $3 or more!
I knew it was possible to make homemade flour tortillas so I thought I’d try. Let me tell you, they are so easy to make and delicious! (Especially when you eat them when they’re still fresh and warm.)
Making homemade flour tortillas at home is really inexpensive and you most likely have everything in your pantry already. Flour, oil, baking powder and some salt. It will take a bit of time to cook your tortillas but it is still easy. If you think you will be making homemade flour tortillas regularly, you may want to consider purchasing a tortilla pressto make the process easier.
INGREDIENTS
3 cups Flour
1 tsp Salt
1 tsp Baking Powder
1/2 cup Vegetable Oil
1 cup Warm Water
DIRECTIONS
Step 1: Using a stand mixer, whisk dry ingredients until combined. Add water and oil and mix, scraping down the sides as needed until ball forms. Mix for two more minutes until dough is smooth.
Step 2: Turn out onto floured work surface and divide into 16 pieces and roll each into a ball. Allow to rest for 10 minutes. Preheat skillet over medium heat.
Step 3: Roll out each ball into a 6″ circle.
Step 4: Cook each tortilla on first side for about a minute, until brown spots form, then flip and cook other side for about 20 seconds. (Or use a tortilla press.)
Stack cooked tortillas and wrap in a clean towel to cool.
If not being used immediately, store in a zip lock bag.
These homemade tortillas were so easy and so much better than store bought. I’ll be making these on a regular basis over here. They’re perfect for snacks and for meals. What do you use tortillas for in your house?
Sometimes, the secret to saving money is actually spending a little more money in the first place.
As long as you spend it on the right things, that is.
That might sound illogical, but in reality, it can make a lot of sense when you start thinking about long-term savings.
This is where thoughtful, intentional spending comes in to play.
In this article, I’m not going to be talking about gadgets that you will only use once, like a Cake Pop Maker for example. I am going to list out products that you will use time and time again, allowing you to see financial savings in the long run. Smart purchases that will save money in the long run!
On that note, to help you save cash and satisfy your gadget purchasing desire, I’ve rounded up 22 smart purchases that will end up saving you tons of cash in the long run. The best part? They don’t require you to change any of your everyday habits.
Smart purchases that save money:
Low flow shower head – Why not have a great shower and save water at the same time? A low flow shower head doesn’t cost a lot to replace, but the savings on your water bill will really pay off in the long run!
LED light bulbs – While they cost more upfront, LED lightbulbs are a smart choice in your home. they save money on your energy bill and last way longer than incandescent light bulbs. There are many different options to get just the right color warmth that you like.
Solar powered outdoor lights – Light up your yard to add safety and ambiance by using solar powered outdoor lights. Once purchased, these won’t cost a cent on your energy bill!
Drying rack– Do we always need to use the dryer? You can save a lot of electricity by using a drying rack instead! You will also find your clothes last longer too. If you have yard space outside to have a drying line, this is a fantastic way to dry stuff
Smart thermostat – Monitor your energy usage easily with a smart thermostat in your home! This will adjust heating/cooling according to your schedule. You can even control it from anywhere using your Android or iOS device. No more heating and cooling an empty house when you’re gone!
Reusable food storage bags – Stop throwing plastic bags (and money) in the trash. These reusable storage bags are easy to clean and ready to use for a long, long time. I especially like that these ones are self-standing…makes it easy to fill!
Brita water jug – Very, very rarely will we buy bottled water. We do, however, use our Brita every single day. We fill up glasses at home or fill our reusable water bottles for adventure days.
Reusable water bottle – Speaking of reusable water bottles, never buy bottled water again! I really like this Simple Modern one. My daughter uses it for school and dance and it never leaks! Even when it’s on its side.
Air fryer – Hear me out on this one. It might seem like a gadget, but our air fryer has really made my life better. It has made lunch making and heating up leftovers a breeze. Let’s not forget to mention that it saves so much money because I’m not getting takeout as often!
Wool Dryer balls – These don’t seem like anything special, but this is one of those purchases that save money like crazy. They save money on fabric softeners and dryer sheets because they soften naturally. They also lessen the drying time needed so they will save you money on your energy bill.
Rechargeable batteries – If you find yourself going through batteries often, investing in rechargeable batteries is a smart idea!
Fire TV Stick has been a TOTAL game changer for us! We bought one when we decided to eliminate cable tv. It plugs into the back of your tv and has a homepage for all your streaming services. Save a TON of money with the free tv apps it offers.
Hair clipper kit – This one might not be for everyone, but we have saved a lot of money by cutting my husband’s hair at home. I give him a very basic hair cut every 6 weeks or so and he’s always pleased as punch.
Vacuum Sealer – How many times have you thrown away foods that are so badly freezer burned? Well, say goodbye to freezer burnt food by investing in a vacuum sealer. Once you’ve sealed your food, toss it in the freezer and you’ll find it stays fresher for so much longer.
Reusable K Cup Coffee Filter – Those little K-Cups can really add up after awhile! If you own a Keurig machine, think about buying a reusable k-cup coffee filter so you can buy your favourite grounds to use in the filter. You’ll have delicious coffee and save money!
TubShroom – I don’t even remember how I came across this in the first place, but I purchased a TubShroom and LOVE it! It’s been years since we’ve been using one and I will never go back to an ordinary drain protector. It catches so much hair. I’m convinced that this is one of those purchases that save money in the long run.
Makeup remover cloths – I really like those disposable, pre-moistened face towels so I really think these makeup remover cloths would be just as convenient. Plus, they’re reusable of course!
Personal finance books – I’ve got a list of highly rated personal finance books right here. First though, why don’t you see if your library has any copies available?
Memberships – Do you find yourself often visiting the same places and paying the daily rate? It might be time to purchase the membership! Buying a membership to places that you frequent often can save you so much money in the long run. Think swimming pools, science centers, amusement parks and more!
Drain snake – Having a drain snake on hand will without a doubt save you money on expensive drain cleaners that don’t necessarily work. Not to mention, a drain snake could save you having to hire a plumber too!
Bamboo towels – These bamboo towels are such a great idea. Especially if you think it will be hard to get away from using regular paper towels. These bamboo towels are washable and can be used just like how you use regular paper towels.
Fabric Defuzzer – Before you discard of any pilled sweaters or even furniture, try a fabric defuzzer! For less than $15, you can save your favorite things and make them look brand new again with this simple tool!
In conclusion, making smart purchases that prioritize quality and durability is not just a matter of saving money in the short term; it is a strategy for long-term financial well-being. By choosing products that stand the test of time and offer lasting value, you can enjoy the satisfaction of smart purchasing decisions that will contribute to your financial stability. As well as taking steps to be a more intentional consumer.
What are some smart purchases that you would add to the list?
Eating out with the whole family can be expensive. However, I am here today to help you make it more affordable! I have compiled a list of where kids eat free in Canada! I think this will definitely help you save a bit on your food budget! I know that this list may not be complete, but I can always add to it once I discover new restaurants…with your help!
Where Kids Eat Free in Canada
Denny’s– Kids 10 and under eat free on Tuesdays from 4-10pm with the purchase of an adult entrée.
East Side Mario’s – Not free, but cheap! Kids 10 and under eat for $2 every Tuesday with the purchase of any adult entrée $19.99 or more.
Woody’s BBQ – Kids eat Free night varies by each location. So contact your nearest one for details.
Mongo’s Grill – Kids 10 an under eat free on Tuesdays. Limit 2 kids per paying adult.
Ricky’s – Kids eat free on their birthday after signing up for the Birthday Club.
Lone Star Texas Grill – Kids receive a free meal on their birthday after signing up for the Little Sizzlers Birthday Club.
Please keep in mind that not every location will be participating in the Kids Eat Free in Canada offers. Please call ahead to the restaurant you will be visiting, to find out if they are participating.
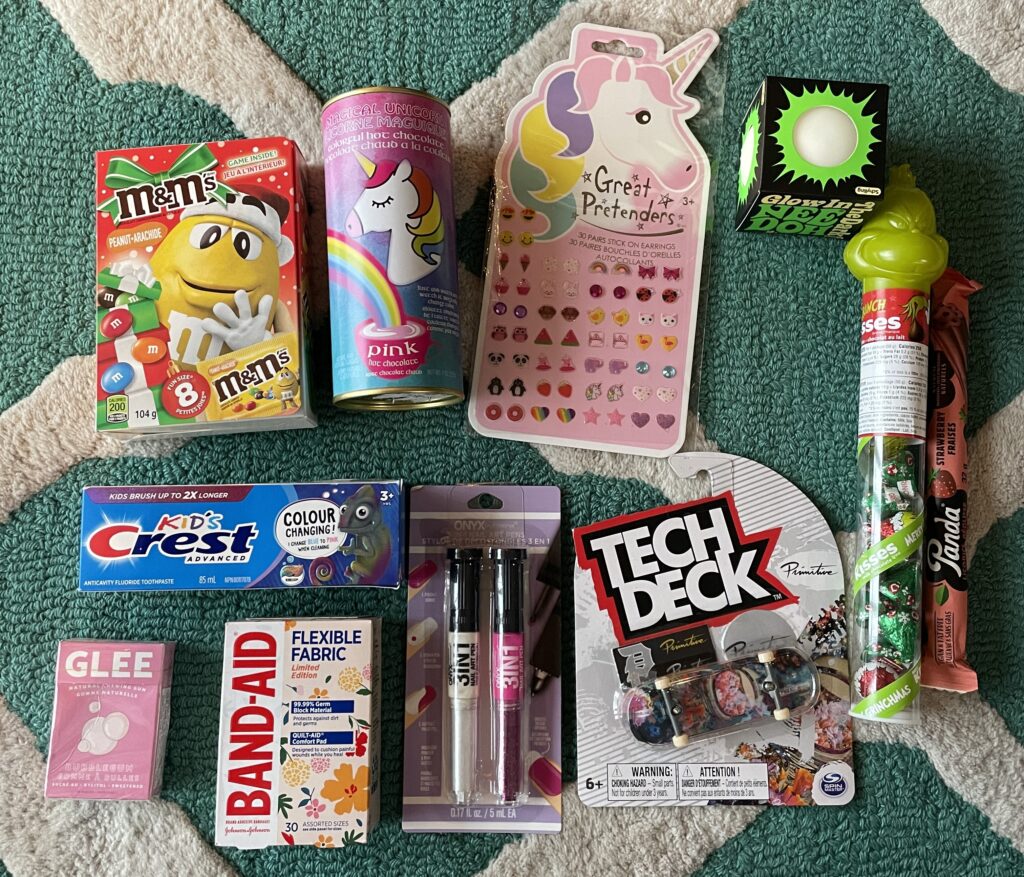
I always enjoy seeing what others buy their kids for Christmas. Especially stocking stuffers. So I thought it would be fun to share what we bought our daughters this year!
I find it can be so easy to buy little things just for the sake of filling the stockings.
Over the years, I have found myself becoming more intentional with what I buy. I like to buy some practical items, consumable items and just for fun items.
How do you like to fill stockings?
In the past, I have done almost identical things for both of my daughters. However, this year, they have significantly different likes. (The almost 12 year old is waaay over toys. haha!)
Without further ado, here are the items I bought for my daughters. Age 7 and age 11.
Amazon has switched over to Cyber Monday Deals now! Black Friday/Cyber Monday is my favorite time to shop for Christmas presents. Not just because the deals are great, but because then there’s more time for enjoying all the fun December activities that go along with the season. Below is a list of my favorite deals.
My daughters love decorating gingerbread houses every year before Christmas. Probably, most likely, because they get to consume candy. But I also like to think it’s because of the creative process and making something cute.
We like to make a special evening or weekend day out of it by adding hot chocolate and having Christmas carols playing in the background.
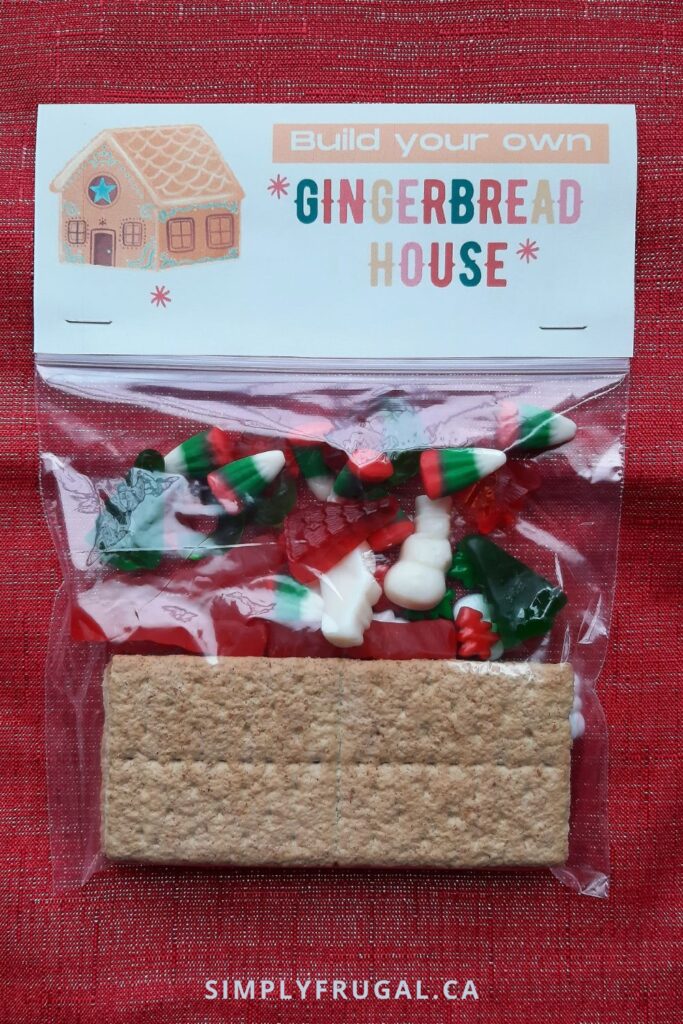
This year, I thought it would be fun to create little gingerbread house kits. I even had fun creating a Build Your Own Gingerbread House tag to make them way more official. Lol.
To assemble them, add 8 square graham crackers or 4 of the large rectangle ones if they are the brand name ones by Christie (pictured below). I like the brand name ones best because you can cut the large rectangle on the top half on an angle so it has a point. This is so the roof crackers have a sturdier resting point.
After this, fill the bag with an assortment of candy. I bought all of ours from Bulk Barn. Seal the sandwich bag.
Once you’ve printed out the tag, cut it out, fold it in half, then staple it to the top of the sandwich bag. Ta da!
The icing I used didn’t fit inside the bags, however, you could create a mini piping bag filled with icing that should fit nicely if you’re giving it as a gift!
You can make your own icing or you can buy it like I do. The premade icing in a can by Betty Crocker and the likes, also works really well!
I think it would be so fun to have a Gingerbread House making party with a bunch of friends! Young or old!
What are your holiday traditions that you find yourself doing every year?