Feb 5 | Easy DIY
These days, homemade items are becoming more and more popular. Most people have found they can quickly and inexpensively make most of the products they buy from the store with items they have in their home. This is great for many reasons but mainly because you know exactly what is going into your products. For many households essential oils have been replacing store bought products in their homes for years now! Everything from all-purpose cleaners to acid reflux relief comes from those tiny bottles.
Homemade Owie Ointment

One of our favorite things to make at home is homemade Owie Ointment or homemade Polysporin. You can really use a lot of items to make this a helpful ointment.
INGREDIENTS:
DIRECTIONS:
- Melt Shea butter (or coconut oil) by placing a small amount (1-2 teaspoons) into a glass bowl. Set that glass bowl over boiling water until Shea butter is fully melted.
- Remove from heat and allow the Shea butter to cool for about a minute. Then add 4 drops each of your essential oils. (do half of this if using on a child under the age of 18 months)
- Pour your mixture into the container you plan to store it in. We typically use a lip balm tray and it lasts us well over 6 months.
- Allow to cool and cover. Store at room temperature in a dark place.
This is a great combination to promote healing. Shea butter (or coconut oil) is rich in antioxidants and deeply moisturizes skin while Lavender and Tea Tree calm redness, reduce pain, and clear out bacteria. Vitamin E oil is known for its ability to reduce scaring and promote quick healing. Your boo boos will be healed in no time!
NOTE: If you want to make a large batch of this, simply double the recipe and store in an airtight container.

Jan 21 | Easy DIY

DIYpassion.com shows you how to make a DIY rolling kitchen pantry. Perfect if you have a small kitchen!
Dec 15 | Easy DIY

How to make Whipped Vanilla Coconut Body Scrub
It’s that time of year again when fighting rough, dry skin becomes a full time chore. Make your job easier with just 3 simple ingredients that you can not only pronounce, but are actually safe for consumption (though I wouldn’t recommend it)! It takes only a few minutes to ‘whip’ up this whipped body scrub!
Ingredients for whipped vanilla coconut body scrub
1 cup coconut oil
2/3 cup Epsom salt
1 Tablespoon pure vanilla extract (you could use vanilla essential oil instead, but this is what I had on hand and it worked great.)

Directions for Whipped Vanilla Coconut Body Scrub
You want to start with slightly chilled coconut oil, this helps the body scrub gain the whipped texture. You can mix all ingredients together by hand and call it good, but I chose to mix with my kitchen aid for about 6 minutes to make it a little more fluffy. It’s really that easy!
I keep some in a little dish next to my bathroom sink, and store the rest in a sealed jar. Makes a great gift for your school teacher, friends and family, or for yourself!
More related DIY’s:

Dec 15 | Easy DIY, Holidays

Are you still looking to keep Christmas simple and clutter-free this year? Head over to Setting My Intention to see the list Angela put together of over 25 ideas for clutter-free homemade Christmas gift ideas!
Dec 15 | Easy DIY
I think that this is just the neatest idea! I would have never thought to decorate my own welcome mat! Click here to see how the simple holiday mat is done!
Have you got a frugal DIY project that you’d love to share? Send your idea or blog post to me here!
Nov 25 | Easy DIY, Holiday Crafts, Holidays, Homemade Christmas Gifts

This year for Christmas, I wanted to create something personal and unique for our nieces. Especially since they have somewhat unique names themselves. I know what it’s like to have an unusual name and not be able to find my name personalized on anything in the stores!
This may not be a surprise to most of you, but I like easy projects. (Easy with a capital ‘E’.) If a craft project will take me longer than an hour to complete, I say forget about it. This Sharpie mug project is almost embarrassingly easy. Including the mug washing, drawing and baking, these mugs were finished in an hour. And the baking takes 45 minutes!
Here is how to make DIY Sharpie Snowman Mugs:
You will need:
- White china mugs
- oil based paint pens (I used orange and black for my designs)
- Rubbing alcohol
- Cotton swabs
- Oven
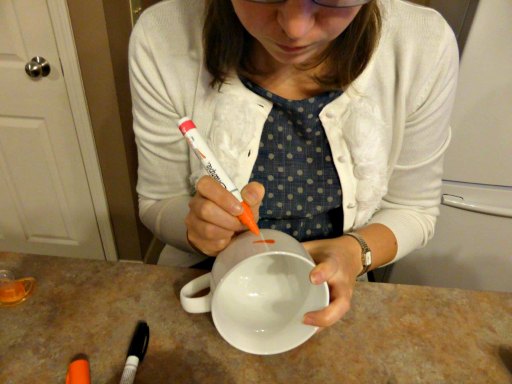
1. Head to your nearest dollar store and buy some plain white china mugs. Then hit up Michaels (use the 40% off coupon!) or a craft store that sells oil based paint pens. They must be oil based or the ink will rub off after use.
2. Wash the mugs in hot soapy water. Dry thoroughly. Clean the area you will be drawing on with rubbing alcohol.

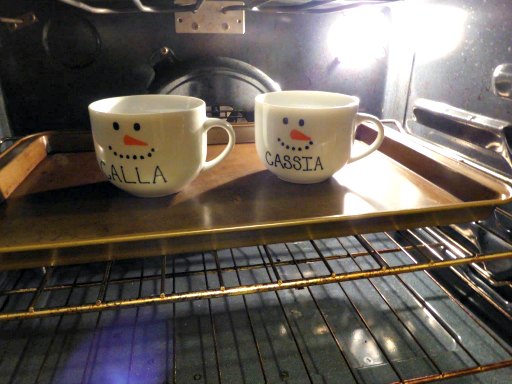
3. Start drawing the snowman face. (Copy my finished pictures if you want.) If you make a mistake, the ink rubs off easily with rubbing alcohol and a cotton swab.
4. Once you’re satisfied with your drawings, place the mugs on a baking sheet. Then place the tray into a cool oven (placing a cool mug into a hot oven may crack your cup!), set the temperature for 350 degrees, and then bake for 45 minutes.
Note: Be sure to hand wash these mugs! Placing them in the dishwasher could result in the ink being removed.

There you go! World’s most simple, but fun craft project! One I’m sure someone on your gift list is sure to love!
Here are some other homemade gift ideas you may like: